
Sending notifications
Using the REST API to send push notifications
Sending notifications with the REST API is done through the /deliveries API call. This call can be used in many different ways and we'll cover them in this document.
There are two basic approaches to sending notifications using the REST API:
- Using the online dashboard to specify content and target audience, then referencing that in your calls via the
campaignIdparameter - Specify notification content and target audience directly in your call to the REST API.
Specifying a campaignId
campaignIdBy default, notifications sent through the API will appear on the Overview of the dashboard. If you want more detailed metrics, you have to create a campaign in the dashboard before sending the notification.
To create a campaign, go to Notifications, click Create and choose "Send this push Automatically", "When a developer makes a call to the Management API":

When specifying a campaignId parameter in your call to the /deliveries endpoint, the notification and the target audience are those of the corresponding campaign.
Also, all metrics related to this campaign (notifications sent, received and clicked) will be updated when you trigger the campaign via an API call and available on the detail page of the Campaign.
You can override the contents of the notification and the target audience by specifying the corresponding options in your call to the API. For example, specifying a targetSegmentIds parameter will override the audience.
You can find the campaignId on the notification detail page:\ 
Not specifying a campaignId
campaignIdWhen calling the /deliveries endpoint without a campaignId parameter, you will have to specify the contents of the notification via the notification parameter, as well as the target audience with one of the target-related params (targetSegmentIds, targetTags, etc.).
Keep in mind that calls to the /deliveries endpoint that do not specify a campaignId parameter will not be included in the online dashboard metrics. That means that you won't have the number of notifications sent, received or clicked.
Specifying notification content
Whether you've specified a campaignId or not, you have full control over the notification content. In this section we're going to take a detailed look at how to specify notification content.
There are 3 approaches to specifying notification content:
- Using the
notificationparameter to specify the entire content. This works whether you've specified acampaignIdor not. - Using the online dashboard to specify the base content and the
notificationParamsparameter to customize it on a per-call basis. This requires acampaignIdparameter. - Using the online dashboard to specify the base content and the
notificationOverrideparameter to make few adjustments on a per-field basis, by applying a diff on the campaign's notification object. This requires acampaignIdparameter, and is compatible with usingnotificationParams.
Specifying content using the API
In the first approach, you specify a Notification object in JSON format using the notification parameter. Here's an example sending a simple “Hello World!” notification to the entire audience (do not use on a production app):
curl -XPOST https://management-api.wonderpush.com/v1/deliveries?accessToken=YOUR_ACCESS_TOKEN \
  -d targetSegmentIds=@ALL \
  -d notification='{"alert":{"text":"Hello World!"}}'
Let's now send a push with an image:
curl -XPOST https://management-api.wonderpush.com/v1/deliveries?accessToken="YOUR_ACCESS_TOKEN" \
  -d targetSegmentIds=@ALL \
  -d notification='{
  "alert": {
    "text": "Example push notification",
    "ios": {
      "attachments": [
        {
          "url": "https://viago.ca/wp-content/uploads/2017/08/1-Grande-Anse-Seychelles.jpg"
        }
      ]
    },
    "android": {
      "type": "bigPicture",
      "bigPicture": "https://viago.ca/wp-content/uploads/2017/08/1-Grande-Anse-Seychelles.jpg"
    },
    "web": {
      "image": "https://viago.ca/wp-content/uploads/2017/08/1-Grande-Anse-Seychelles.jpg"
    }
  }
}'
All the options available to specify notification content are detailed in the Notification object reference.
Specifying content using the online dashboard
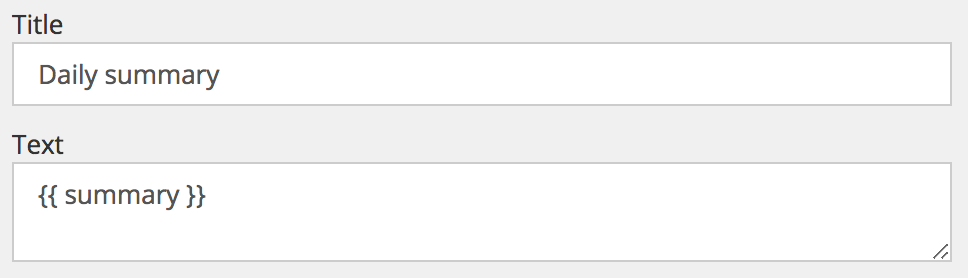
Another approach consists of specifying the content on the online dashboard using liquid syntax to allow customization of some parts of the content. Be sure to check our personalized content documentation for a detailed explanation of how to use liquid with WonderPush.
In the following example, we have setup a notification in the online dashboard with a constant title “Daily summary” and a variable text {{ summary }}:
Take note of the Campaign ID from the notification detail page:
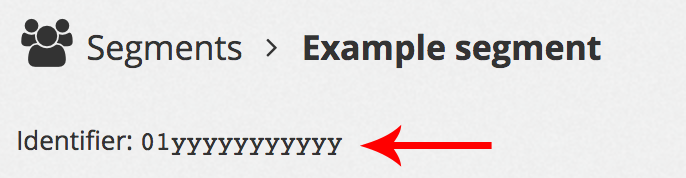
Next, we setup a segment using the online dashboard and take note of its identifier on the segment detail page:
Finally we send the notification with a customized summary variable, replace YOUR_ACCESS_TOKEN, YOUR_CAMPAIGN_ID, YOUR_SEGMENT_ID:
curl -XPOST https://management-api.wonderpush.com/v1/deliveries?accessToken="YOUR_ACCESS_TOKEN" \
       -d campaignId=YOUR_CAMPAIGN_ID \
       -d targetSegmentIds=YOUR_SEGMENT_ID \
       -d notificationParams='{"summary": "example customized summary"}'
This results in the following notification being sent:\ 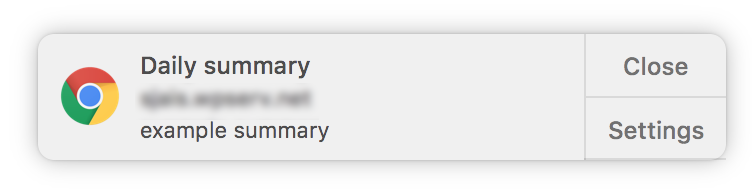
You must specify a target audienceThe
notificationParamsparameter is taken into account when you specify atargetSegmentIds,targetInstallationIds,targetUserIdsor anothertarget*parameter. If you do not specify a target audience, the notification will be sent as specified in the dashboard, without your customized values.
Specifying additional data
You can send additional data along with the push notification by specifying the push.payload key in your payload. Your app or website can then consume this data upon reception of the notification.
In this example, we send a notification with "Example notification" as text and a simple "exampleKey / exampleValue" key/value pair:
curl -XPOST https://management-api.wonderpush.com/v1/deliveries?accessToken="YOUR_ACCESS_TOKEN" \
       -d targetSegmentIds=YOUR_SEGMENT_ID \
       -d notification='{
  "alert": {
    "text": "Example notification"
  },
  "push": {
    "payload": {
      "exampleKey": "exampleValue"
    }
  }
}'
See Push data for examples on how to consume this payload in your app or website.
Adapting notification content to each platform
It is sometimes useful to adapt the content of a notification to the platform it is being sent to. Fortunately, the The Notification object offers 3 sub-properties of its alert property: ios, android and web. This allows you to send different notification content to each platform.
In this example we send a simple broadcast notification with the text “Hello Android!” to Android users, “Hello iOS!” to iOS users, and “Hello Web!” to Website users. Replace YOUR_ACCESS_TOKEN:
curl -XPOST https://management-api.wonderpush.com/v1/deliveries?accessToken="YOUR_ACCESS_TOKEN" \
  -d targetSegmentIds=@ALL \
  -d notification='{
  "alert": {
    "ios": {
      "text": "Hello iOS!"
    },
    "android": {
      "text": "Hello Android!"
    },
    "web": {
      "text": "Hello Web!"
    }
  }
}'
Sending to a tag
If you wish to target users that have a certain tag, use the targetTags parameter. For example, to target all users that have the tag customer:
curl -XPOST https://management-api.wonderpush.com/v1/deliveries?accessToken="YOUR_ACCESS_TOKEN" \
       -d targetTags=customer \
       -d notification='{"alert": {"text": "Hello World!"}}'
Sending to multiple tags
We always make sure users don't get the same notification twice, so combining tags is safe.
Combining tags with OR
You can send notifications to users that have a certain tag OR another given tag.
To achieve this, use the targetTags parameter, providing it a comma-separated list of tags.
For example, you can reach users that have either the customer OR the newsletter tags like this:
curl -XPOST https://management-api.wonderpush.com/v1/deliveries?accessToken="YOUR_ACCESS_TOKEN" \
       -d targetTags=customer,newsletter \
       -d notification='{"alert": {"text": "We have new products, come check them out!"}}'
Combining tags with AND
You can send notifications to users that have a certain tag AND another given tag.
To achieve this, use the targetTags parameter, providing it a comma-separated list of tags, each of them having the special + prefix.
For example, you can reach users that have both the customer AND newsletter tags like this:
curl -XPOST https://management-api.wonderpush.com/v1/deliveries?accessToken="YOUR_ACCESS_TOKEN" \
       --data-urlencode targetTags=+customer,+newsletter \
       -d notification='{"alert": {"text": "Customer-only private sale on the 14th."}}'
Read the Combining logic of the targetTags parameter section for more information, especially on properly escaping the + character.
Excluding tags
You can send notifications to users that have do NOT have a certain tag.
Excluding a tag sends to your entire user-base except those with the given tag
To achieve this, use the targetTags parameter, providing it a comma-separated list of tags, each of them having the special - prefix.
For example, you can reach users that do NOT have the premium tag like this:
curl -XPOST https://management-api.wonderpush.com/v1/deliveries?accessToken="YOUR_ACCESS_TOKEN" \
       -d targetTags=-premium \
       -d notification='{"alert": {"text": "Big discount on our premium plan!"}}'
This will send a message to your entire user-base, except those tagged premium.
Combining logic of the targetTags parameter
targetTags parameterThe targetTags parameters accepts a comma-separated list of tags. These tags can be prefixed by:
+to make them mandatory,-to exclude them.
The combination logic is:
- multiple
+tags are combined with the AND operator, - multiple
-tags are combined with the AND operator, - multiple tags without prefix are combined with the OR operator,
- these 3 groups of tags are combined with the AND operator.
For example:
targetTags=+a,+b,-c,-d,e,fTranslates to:
(a AND b) AND (NOT(c) AND NOT(d)) AND (e OR f)The most complex logic can be specified directly from your dashboard by creating a segment based on tags, where you can monitor the target audience size.
You can then send to this segment using the API.
Properly URL-encode your requestIf you give arguments in the query string, or use the classic
form/x-www-url-encodedbody format, you will need to make sure your values are properly URL-encoded.
Otherwise the+denoting a mandatory segment will be replaced with a space when URL-decoded on the server-side, and the semantic will change from mandatory to optional segment.As a general rule, do not build a URL yourself using concatenation, and avoid tools that leave your input un-encoded or try to be too smart by avoiding double escaping.
When using
curlin command line, use--data-urlencodeor directly escape the+as%2B.You can also use the
--jsoncurl argument followed by a properly JSON formatted body, no other additional encoding is necessary.You can also use other tools like httpie or even graphical tools like Postman.
Sending to one or more segments
This is done by using the targetSegmentIds parameter which allows you to specify one or more segment IDs to target. You can find a segment ID on the segment detail page:
In this example we send a simple “Hello world!” to a particular segment:
curl -XPOST https://management-api.wonderpush.com/v1/deliveries?accessToken="YOUR_ACCESS_TOKEN" \
       -d targetSegmentIds=YOUR_SEGMENT_ID \
       -d notification='{"alert": {"text": "Hello World!"}}'
You can target multiple segments by specifying them separated by commas in the targetSegmentIds parameter:
curl -XPOST https://management-api.wonderpush.com/v1/deliveries?accessToken="YOUR_ACCESS_TOKEN" \
       -d targetSegmentIds=a,b,c \
       -d notification='{"alert": {"text": "Hello World!"}}'
Installations that belong to multiple segments, like both to the segment a and segment b, will be notified only once. This is a big advantage over sending multiple push independently.
Combining segments
This generalizes the use of multiple segments and permits to define mandatory and excluded segments. Take this example:
curl -XPOST https://management-api.wonderpush.com/v1/deliveries?accessToken="YOUR_ACCESS_TOKEN" \
       --data-urlencode targetSegmentIds=a,b,c,+m,+n,+o,-x,-y,-z \
       -d notification='{"alert":{"text":"Hello, combined segments!"}}'
In the above example we specified targetSegmentIds=a,b,c,+m,+n,+o,-x,-y,-z.
First, installations must match at least one segment among a, b and c to be candidates for being sent a notification.
Then, installations must match all segments m, n and o to be retained.
Finally, installations matching any segment x, y or z would be discarded.
In other words, it is equivalent to the following query: (a OR b OR c) AND (m AND n AND o) AND (NOT(x) AND NOT(y) AND NOT(z)).
If you only specify excluded segments, then all installations except those being excluded will be sent a notification.
When using only one segment, targetSegmentIds=a and targetSegmentIds=+a are equivalent.
When using only one optional segment, targetSegmentIds=a,+b,+c and targetSegmentIds=+a,+b,+c are equivalent.
Sending to one or more installations
If you know precisely which installation you want to notify, using segments seems like using a sledgehammer to crack a nut.
To send to one or more installationIds, use the targetInstallationIds parameter. You can find the installation ID on the installation detail page.
In this example we send a simple “Hello world!” to an installation:
curl -XPOST https://management-api.wonderpush.com/v1/deliveries?accessToken="YOUR_ACCESS_TOKEN" \
       -d targetInstallationIds=YOUR_INSTALLATION_ID \
       -d notification='{"alert": {"text": "Hello World!"}}'
In this example we send a simple “Hello world!” to several installations:
curl -XPOST https://management-api.wonderpush.com/v1/deliveries?accessToken="YOUR_ACCESS_TOKEN" \
       -d targetInstallationIds=INSTALLATION_ID_1,INSTALLATION_ID_2  \
       -d notification='{"alert": {"text": "Hello World!"}}'
Sending localized notifications
By providing a value in the notification locale field, you can tie the notification to subscribers associated with this locale. You can use the notifications argument to provide multiple notifications at once. The matching variants will be sent to each subscriber according to their locale.
If you want to send a default notification to subscribers from locales you do not have a translation for instead of de facto removing them from the audience, make sure to omit the locale field on the notification considered the default variant. This way subscribers from a locale you have no localized content for will still receive your notification.
In the following example we send a simple “Hello, world!” notification translated in French and Spanish, and send the English variant to all subscribers speaking another language:
curl -XPOST https://management-api.wonderpush.com/v1/deliveries?accessToken="YOUR_ACCESS_TOKEN" \
       -d targetSegmentIds=@ALL  \
       -d notifications='[
           {"alert": {"text": "Hello, world!"}},
           {"alert": {"text": "Bonjour, le monde !"}, "locale": "fr"},
           {"alert": {"text": "¡Hola, mundo!"}, "locale": "es"}
       ]'
Every subscriber will hence receive “Hello, world!”, except French and Spanish subscribers that will receive it in their own language.
In the following example we send a simple “Hello world!” notification translated in French and Spanish, like before, but do not send the English variant to subscribers speaking another language because every notification has a locale attached to it:
curl -XPOST https://management-api.wonderpush.com/v1/deliveries?accessToken="YOUR_ACCESS_TOKEN" \
       -d targetSegmentIds=@ALL  \
       -d notifications='[
           {"alert": {"text": "Hello, world!"}, "locale": "en"},
           {"alert": {"text": "Bonjour, le monde !"}, "locale": "fr"},
           {"alert": {"text": "¡Hola, mundo!"}, "locale": "es"}
       ]'
Every English-speaking subscriber will receive “Hello, world!”, every French- and Spanish-speaking subscribers that will receive it in their own language, but subscribers speaking other languages will not receive anything.
Sending A/B tests
After considering the locale of the notifications like described above, if multiple variants are eligible for a given subscriber, one of them will be chosen uniformly at random.
In the following example we send a simple “Hello, world!” VS “Hi!” A/B test notification translated in French and Spanish, and send the English variant to all subscribers speaking another language:
curl -XPOST https://management-api.wonderpush.com/v1/deliveries?accessToken="YOUR_ACCESS_TOKEN" \
       -d targetSegmentIds=@ALL  \
       -d notifications='[
           {"alert": {"text": "Hello, world!"}},
           {"alert": {"text": "Hi!"}},
           {"alert": {"text": "Bonjour, le monde !"}, "locale": "fr"},
           {"alert": {"text": "Salut !"}, "locale": "fr"},
           {"alert": {"text": "¡Hola, mundo!"}, "locale": "es"},
           {"alert": {"text": "¡Hola!"}, "locale": "es"}
       ]'
Every subscriber will hence receive either “Hello, world!” or “Hi!” with a 50% chance, except French and Spanish subscribers that will receive “Bonjour, le monde !” or “Salut !”, and “¡Hola, mundo!” or “¡Hola!” respectively.
There is no obligation to provide a similar number of variants by locale.
This works also without localization, when all notifications lack the locale field.
Updated 12 months ago