
Manual iOS Integration
Integrate WonderPush to your Xcode project without using a package manager like CocoaPods
To upgrade to the latest version of our SDK, follow these instructions.
Prerequisites
Getting started with WonderPush is easy.
You'll need:
- Xcode
- An iOS device such as an iPhone or an iPad
- An iOS Push Certificate (here's a how to obtain it)
- An Xcode project your iOS application
If you haven't already, sign up for a free account on wonderpush.com.
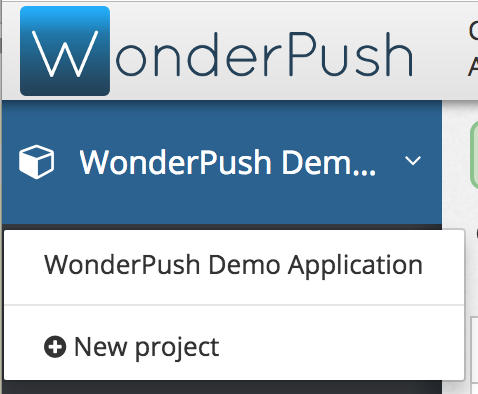
Step 1. Create your project
Click on New Project:
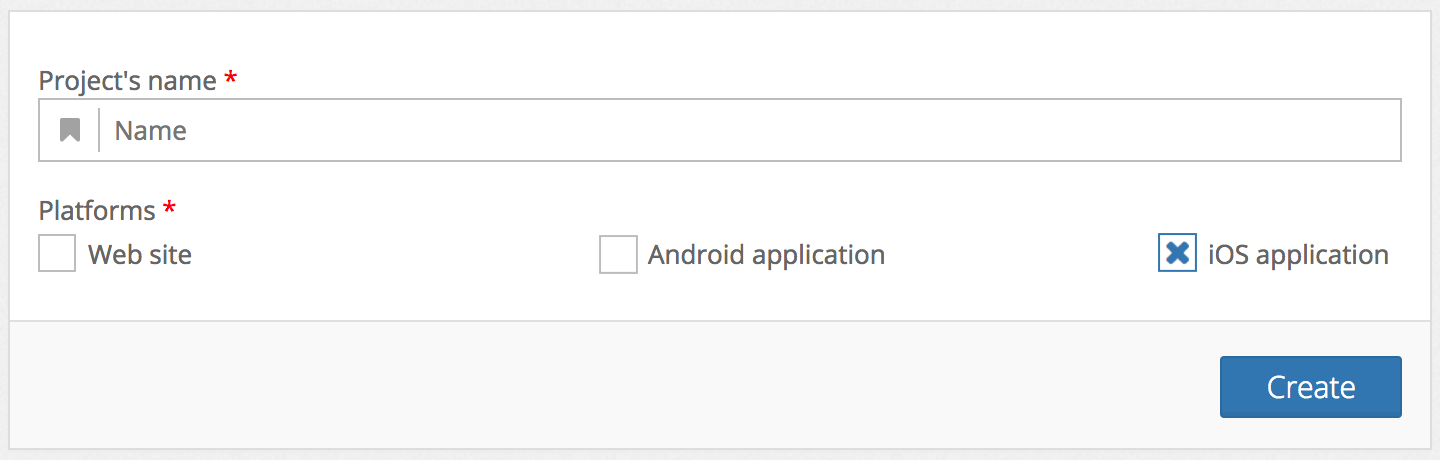
Choose a name for your project and select iOS as a platform then click Create:
Already have a project?Just add the iOS platform to any existing project by going to Settings, selecting the first tab named after your project and clicking Edit. You'll be presented a form that lets you add a platform.
Step 2. Upload your push credentials
Get your Apple key with the Apple Push Notifications service (APNs) service enabled. You can list your existing keys here. Simply check the Enabled Services and note the Key ID as well as the Team ID displayed below your name in the top-right corner.
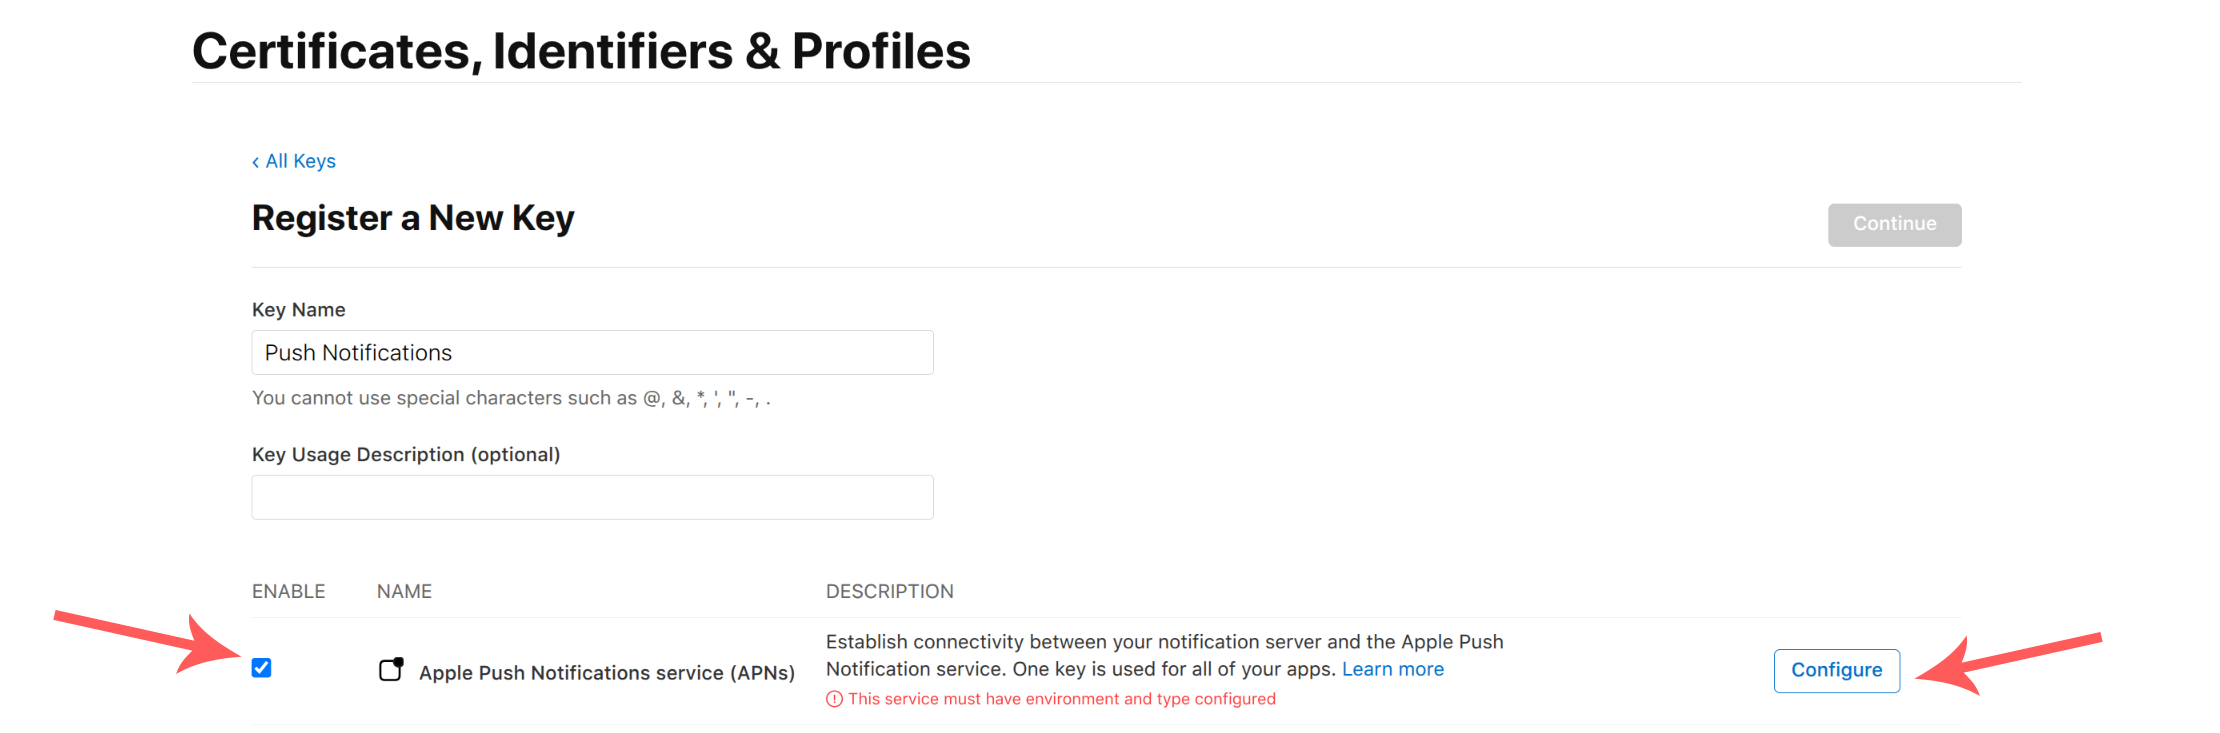
If you don't have one, here's how to create one. In a few words, head to the Apple developer website, go to Accounts, then click on Keys in the Certificates, Identifiers & Profiles column, and click the + button on the top left to add a new key.
Check Apple Push Notifications service (APNs), then click Configure:
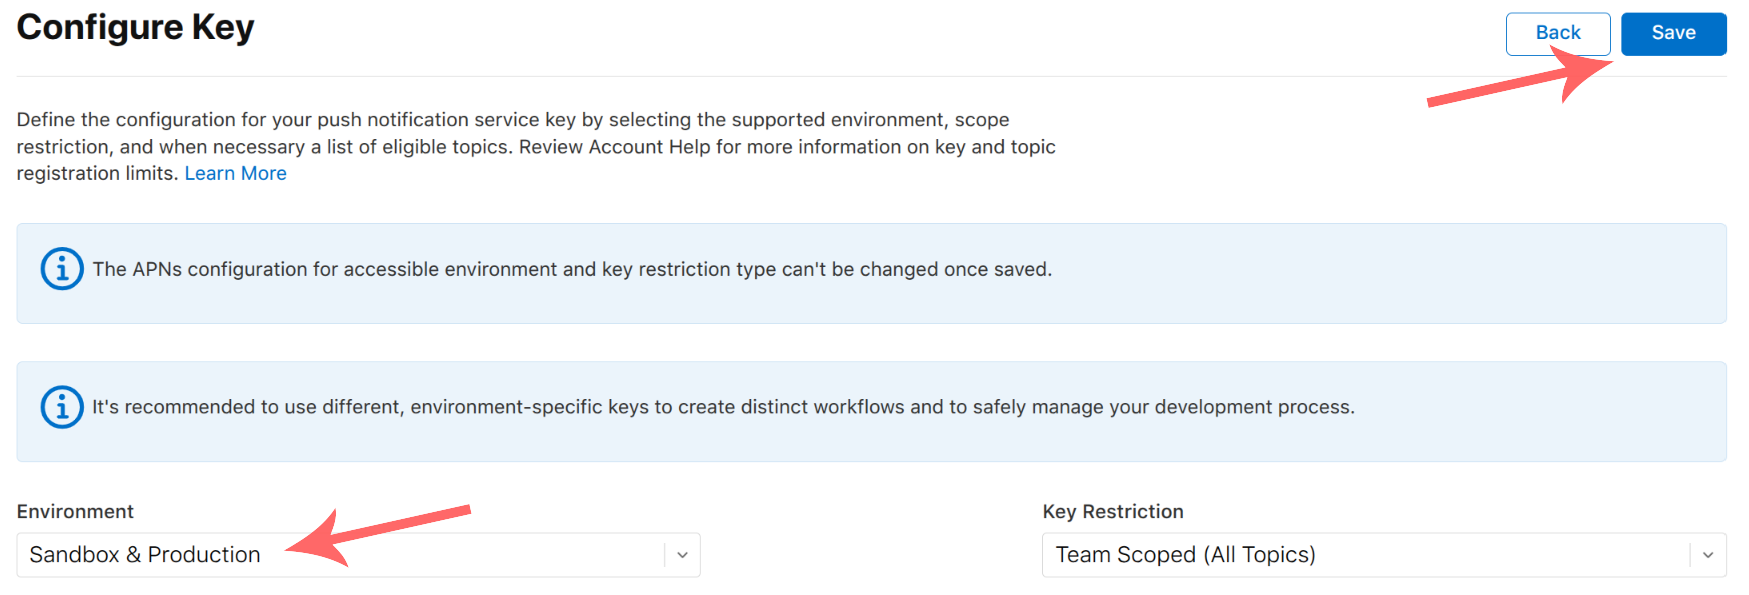
Then in the Environment drop-down, select both: Sandbox & Production, and click Save.
Once back on the previous screen, click Continue.
In the next screen click Register.
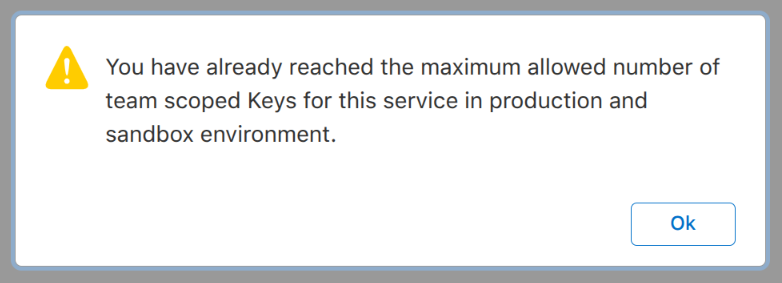
If you see a dialog telling you “You have already reached the maximum allowed number of team scoped Keys for this service in production and sandbox environment.”, this means that you should instead reuse an existing key. As Apple will not let you download the key again after its registration, you will need to use for the
.p8file that you downloaded at that time.
How should Apple keys be managed for the Apple Push Notifications service (APNs)Apple imposes a maximum of 2 keys simultaneously valid for the Apple Push Notifications service (APNs) against all Topics for a given environment configuration. Such keys are valid for all applications (Bundle ID or App ID) on your account (Team ID).
Limiting to 2 keys enables you to have one key used for all your push notification needs across all your WonderPush projects (you'll need to upload the same key for each of your projects) or even push providers, and perform a rolling replacement of your key with no downtime.
You would create a second key, temporarily having 2 valid keys at a time, replace every WonderPush project or services that need to send push notifications, and finally revoke the previous key, leaving you again with a single existing key.
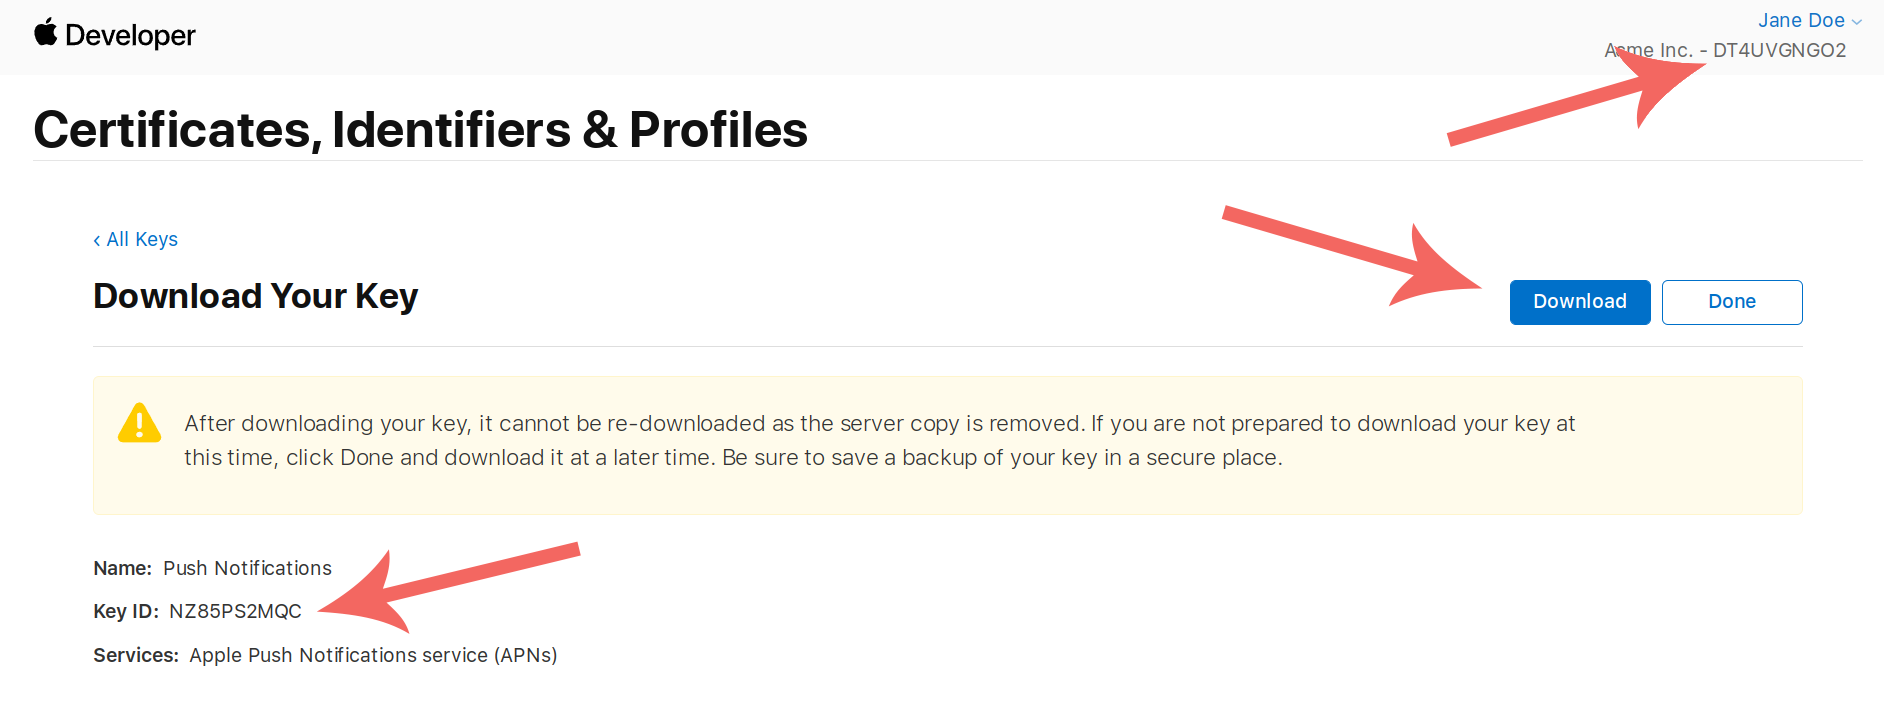
In the next screen, note your Key ID, and your Team ID in the top right corner.
Then click Download. Please do keep this.p8 file in a secure location (see the above callout about key management.)
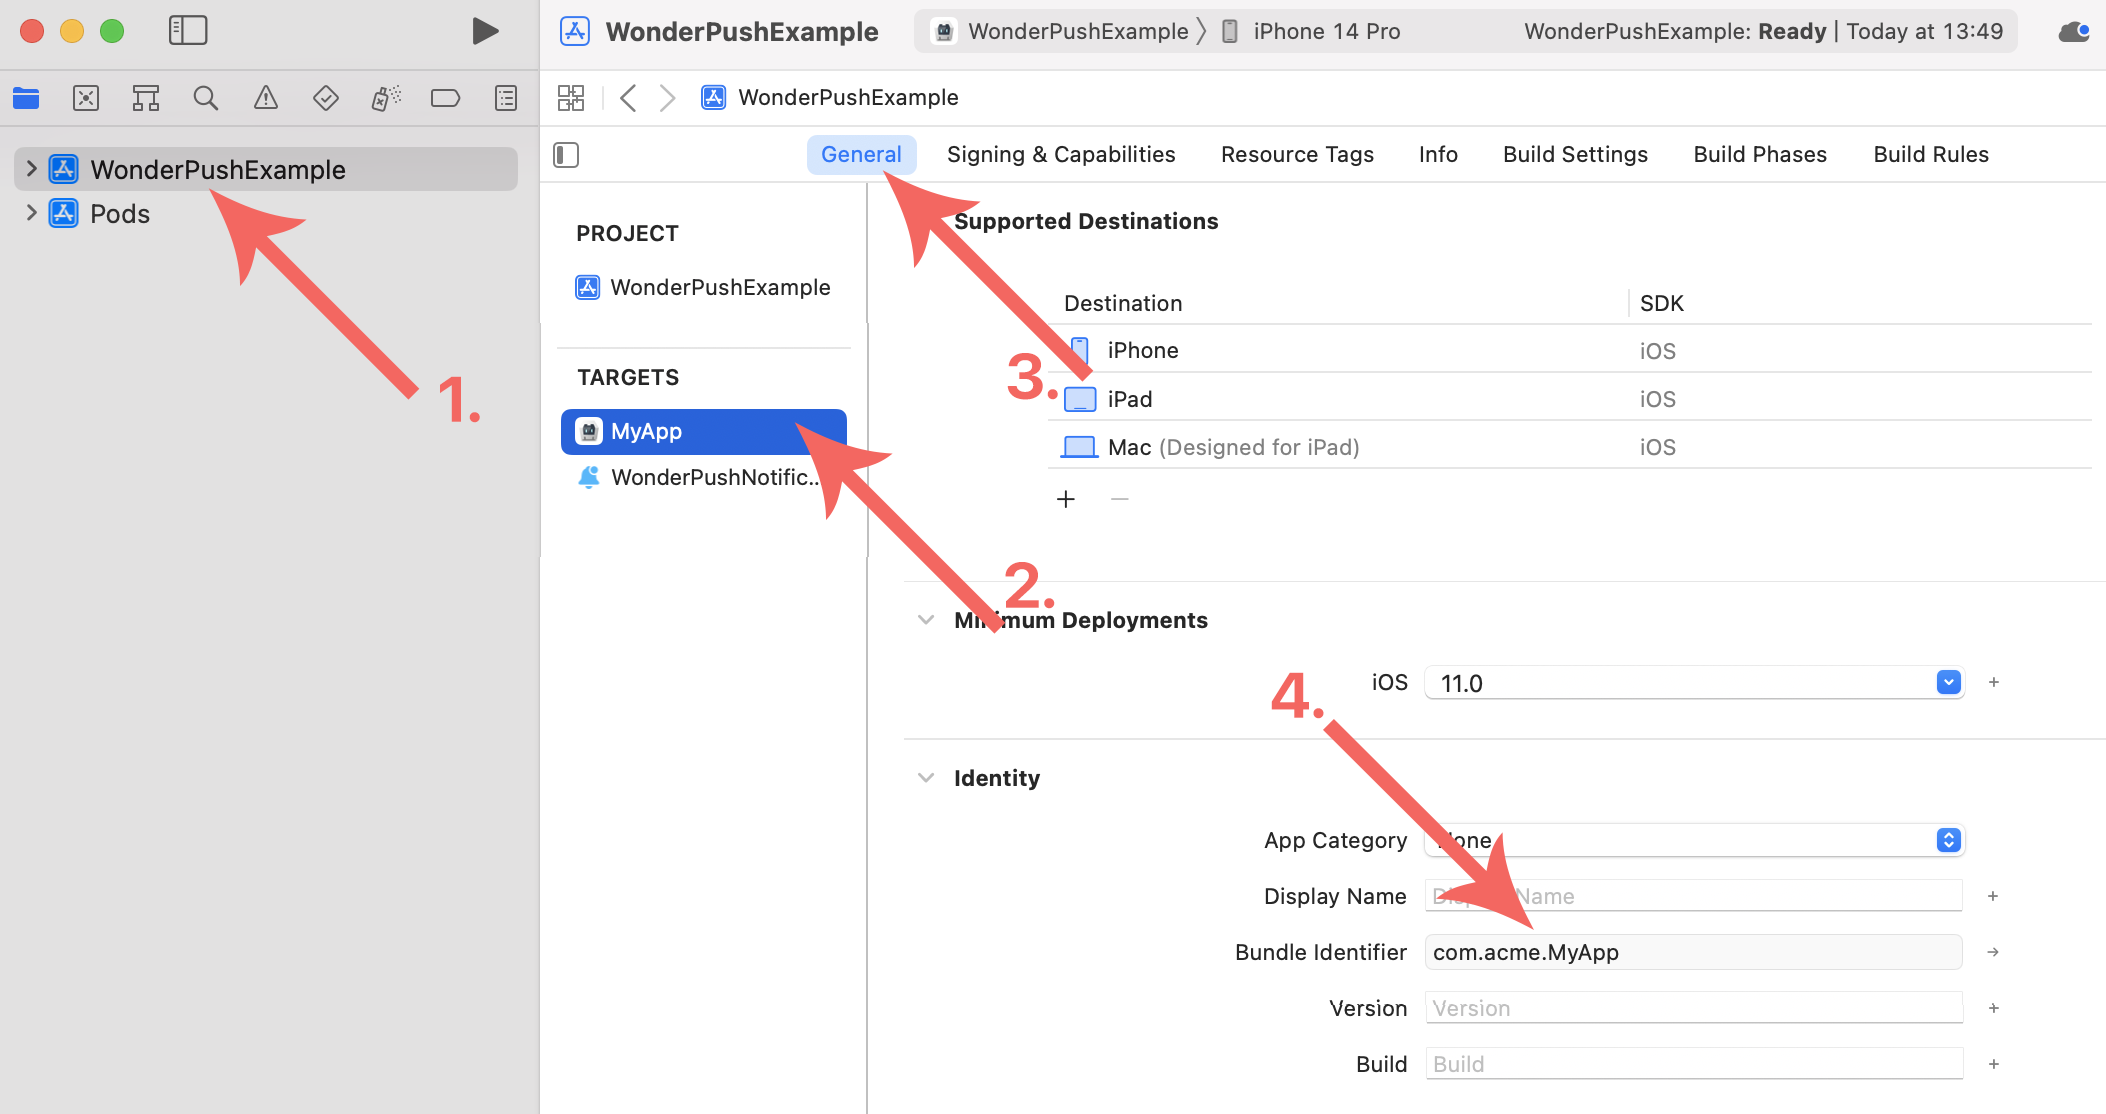
You will then need to know your Bundle ID:
- Open your project in Xcode
- Click on your project in the file browser on the left
- Click on your app target in the list
- Open the General tab
- Your Bundle identifier (aka Bundle ID) is in the Identity section
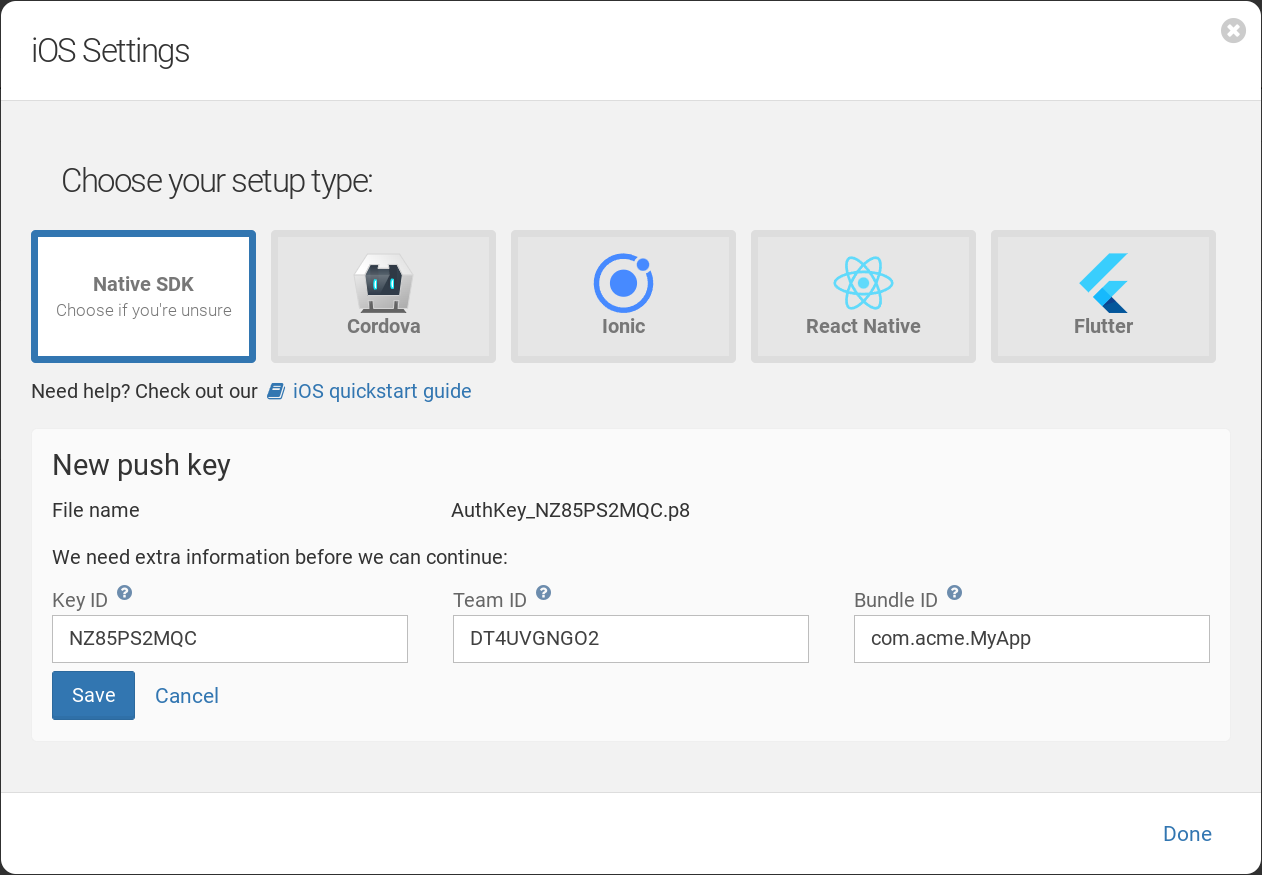
Now go to Settings / Platforms, click the iOS application section title and fill drop your .p8 file:
- Fill the Key ID, Team ID and Bundle ID if necessary. Check their values if they are pre-filled.
- Click Save.
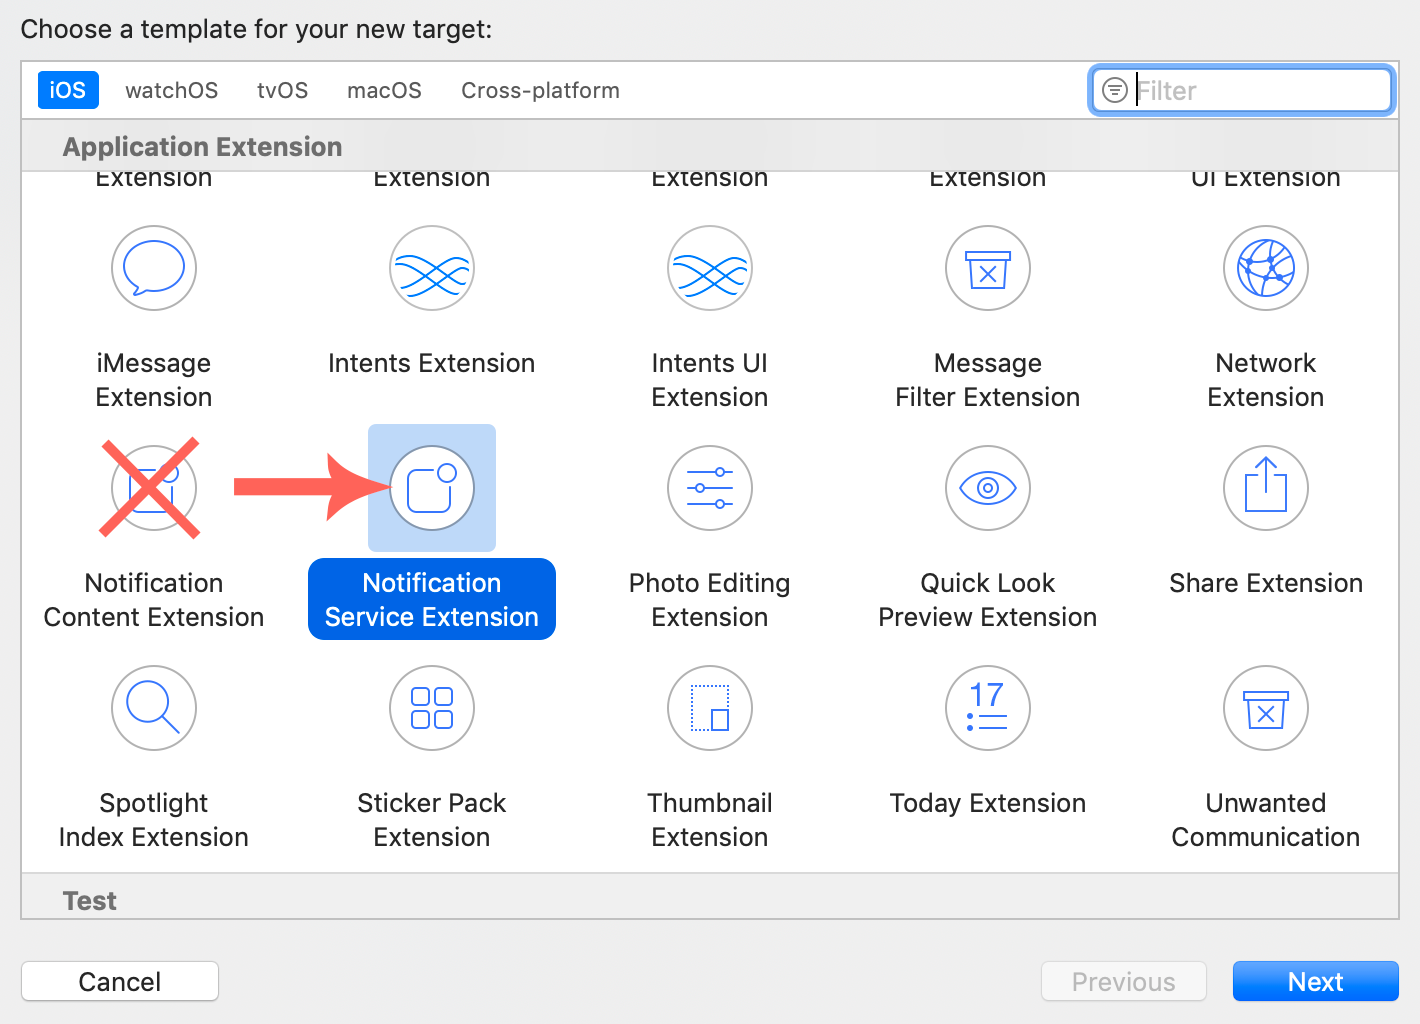
Step 3. Create the notification service extension
In Xcode, select File / New / Target..., and choose Notification Service Extension:
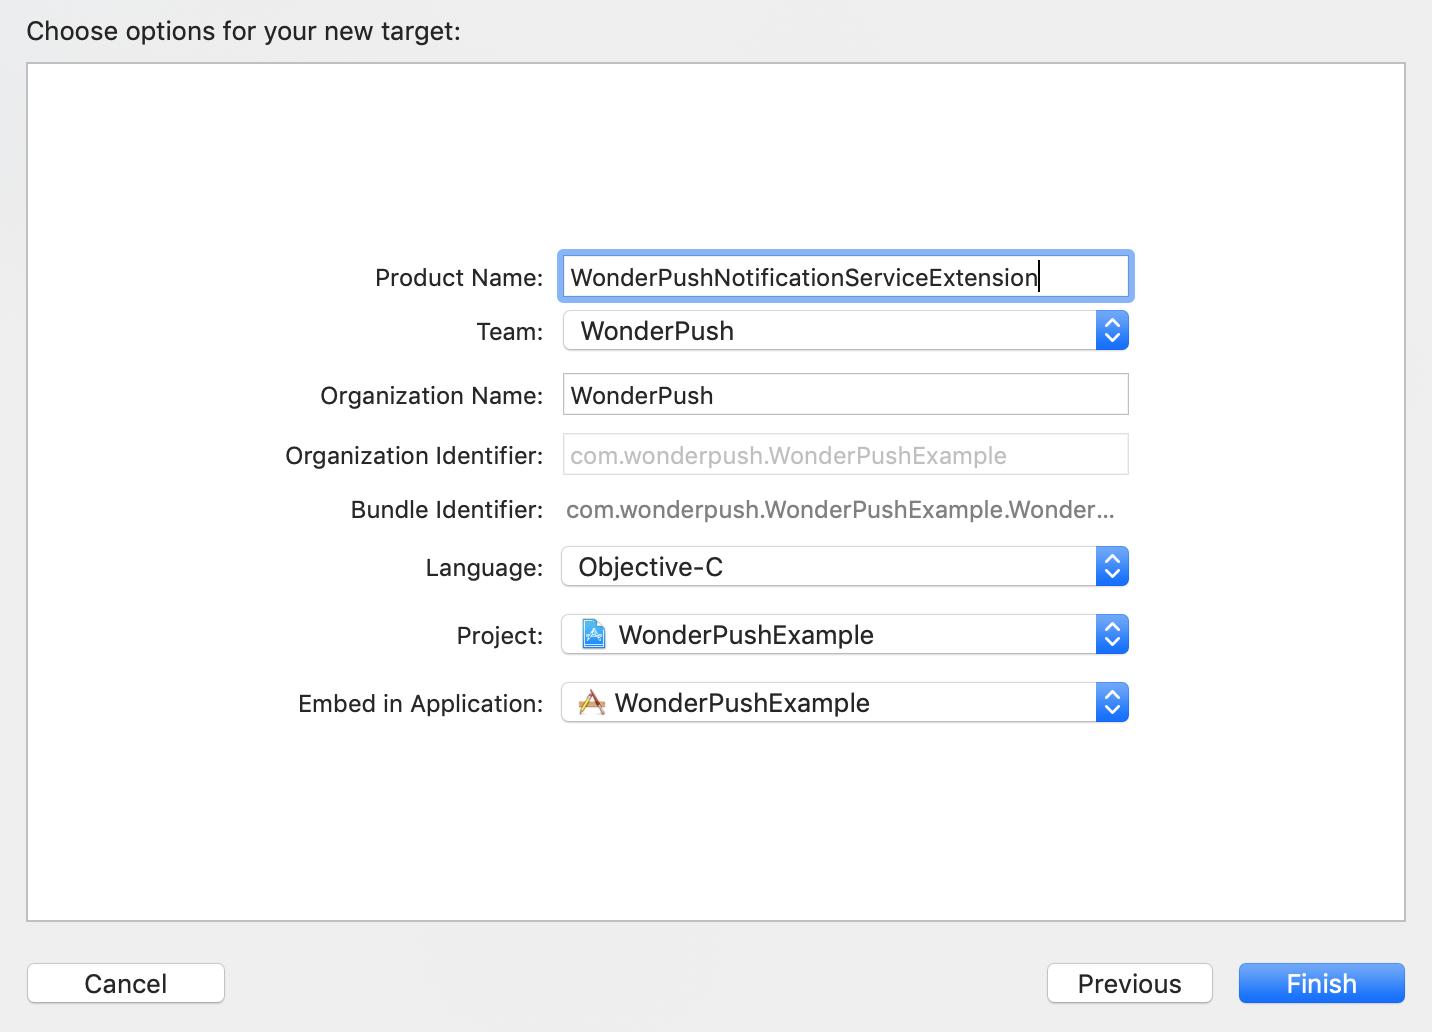
Enter WonderPushNotificationServiceExtension as the name for your new target:
When Xcode prompts you to activate the new scheme, answer Cancel to keep Xcode building and debugging your app instead of the extension:
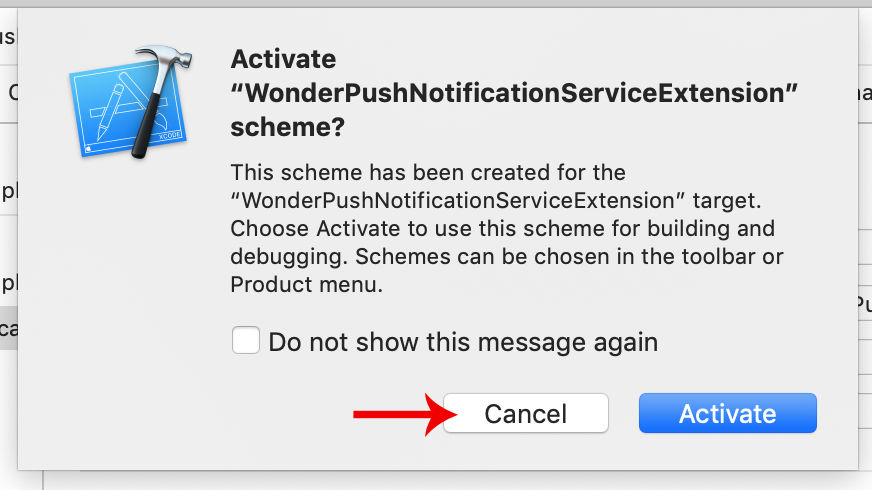
If you activate by mistake, switch back to your app's scheme from the dropdown menu located next to the play button.
Set the Deployment Target of your Notification Service Extension to 11.0 (or the minimum version accepted by Xcode):

Step 4. Integrate WonderPush to your Xcode project
Download the latest Binaries.zip archive from the SDK releases page, which contains 2 files:
WonderPush.xcframeworkWonderPushExtension.xcframework
Drag and drop these 2 files in your project, Copy items if needed checked at your convenience, selecting no target:
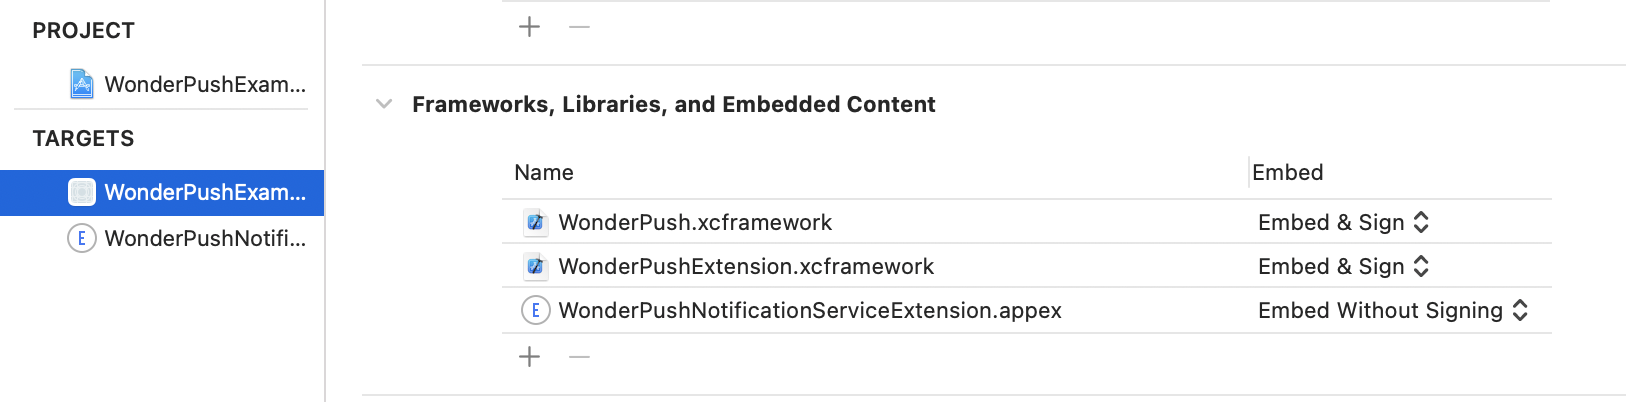
In your project, select the target corresponding to your application and add both frameworks to the Frameworks, Libraries, and Embedded Content section:
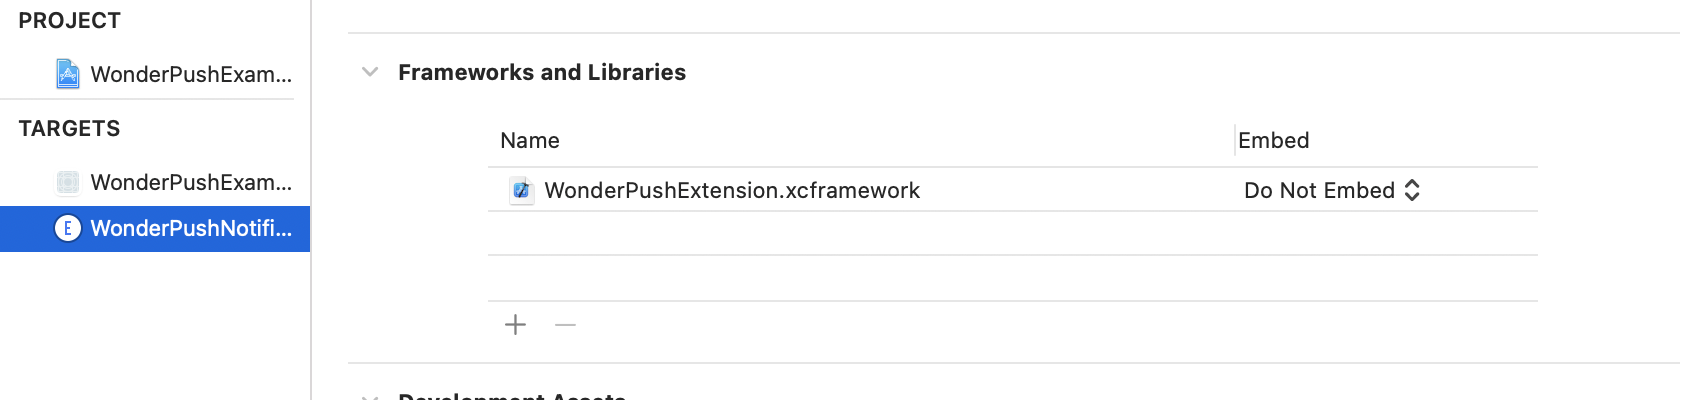
Select the target corresponding to the notification extension we've created previously and add WonderPushExtension.xcframework to the Frameworks and Libraries section and check "Do Not Embed":
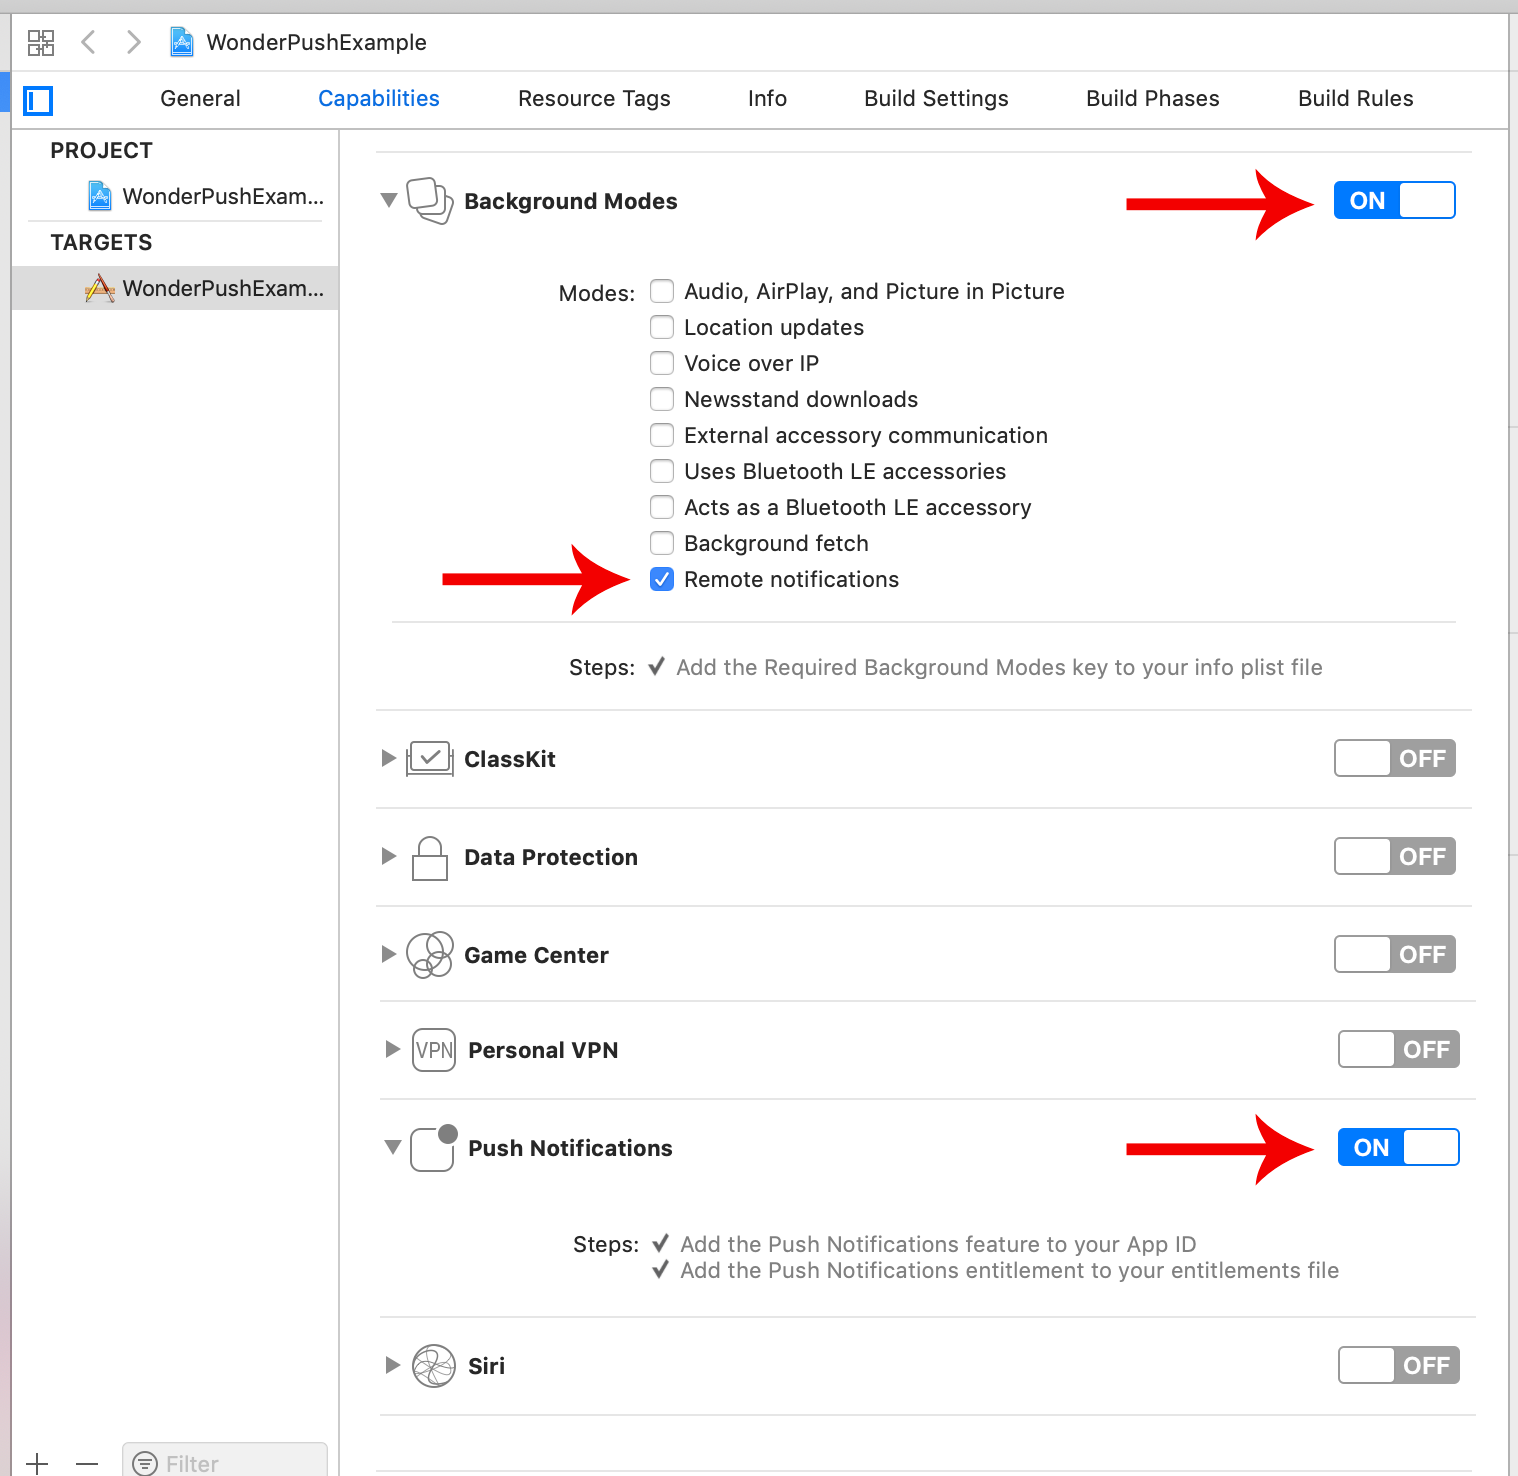
Step 5. Add device capabilities
Select your app's main target and, under the Capabilities tab, make sure:
- the Background Modes capability is ON,
- the Remote notifications background mode is checked,
- the Push Notifications capability is ON.
Step 6. Add required code
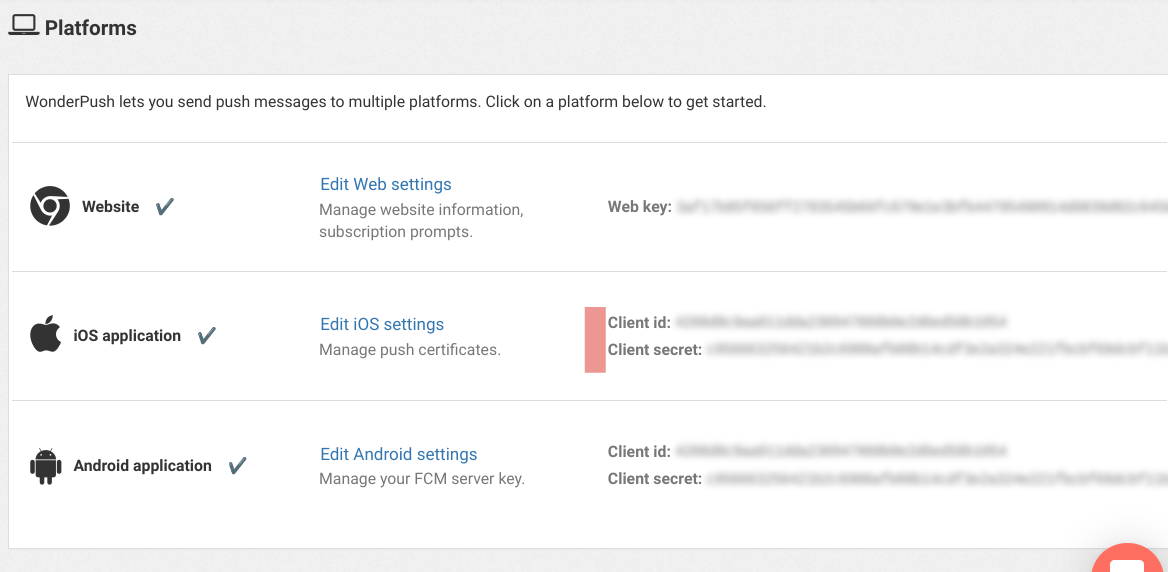
Take note of your Client ID and Client Secret from the iOS app section of the Settings / Platforms page:
Method 1. Storyboard
If you're using Storyboard, open your AppDelegate and add the following, adapting YOUR_CLIENT_ID and YOUR_CLIENT_SECRET with the values you've noted above:
import WonderPush

func application(_ application: UIApplication, willFinishLaunchingWithOptions launchOptions: [UIApplication.LaunchOptionsKey : Any]? = nil) -> Bool {
        WonderPush.setClientId("YOUR_CLIENT_ID", secret: "YOUR_CLIENT_SECRET")
        WonderPush.setupDelegate(for: application)
        WonderPush.setupDelegateForUserNotificationCenter()
        return true
}
#import <WonderPush/WonderPush.h>
- (BOOL)application:(UIApplication *)application willFinishLaunchingWithOptions:(NSDictionary *)launchOptions {
[WonderPush setClientId:@"YOUR_CLIENT_ID" secret:@"YOUR_CLIENT_SECRET"];
[WonderPush setupDelegateForApplication:application];
[WonderPush setupDelegateForUserNotificationCenter];
return YES;
}Prompt users as soon as the app is launched by adding code to the application:didFinishLaunchingWithOptions method of your app delegate. We recommend you move this code to a more suitable place in the user journey later you're done setting up WonderPush.
func application(_ application: UIApplication, didFinishLaunchingWithOptions launchOptions: [UIApplication.LaunchOptionsKey: Any]?) -> Bool {
    // TODO: Move this in a more suitable place in the user journey.
    WonderPush.subscribeToNotifications()
    return true
}
Method 2. SwiftUI
If you're using SwiftUI, start by creating an AppDelegate if you haven't got one already.
- Create a new Cocoa Touch Class in Swift
- Name it AppDelegate
Enter the following code in your AppDelegate, adapting YOUR_CLIENT_ID and YOUR_CLIENT_SECRET with the values you've noted above.
//
//  AppDelegate.swift
//

import UIKit
import WonderPush

class AppDelegate: NSObject, UIApplicationDelegate {
    func application(_ application: UIApplication, willFinishLaunchingWithOptions launchOptions: [UIApplication.LaunchOptionsKey : Any]? = nil) -> Bool {
        WonderPush.setClientId("YOUR_CLIENT_ID", secret: "YOUR_CLIENT_SECRET")
        WonderPush.setupDelegateForUserNotificationCenter()
        return true

    }
    // WonderPush needs to be called whenever the following methods are called
    func application(_ application: UIApplication, didFinishLaunchingWithOptions launchOptions: [UIApplication.LaunchOptionsKey : Any]? = nil) -> Bool {
        WonderPush.application(application, didFinishLaunchingWithOptions: launchOptions)
        return true
    }
    func application(_ application: UIApplication, didRegisterForRemoteNotificationsWithDeviceToken deviceToken: Data) {
        WonderPush.application(application, didRegisterForRemoteNotificationsWithDeviceToken: deviceToken)
    }
    func application(_ application: UIApplication, didFailToRegisterForRemoteNotificationsWithError error: Error) {
        WonderPush.application(application, didFailToRegisterForRemoteNotificationsWithError: error)
    }
    func application(_ application: UIApplication, didReceiveRemoteNotification userInfo: [AnyHashable : Any], fetchCompletionHandler completionHandler: @escaping (UIBackgroundFetchResult) -> Void) {
        WonderPush.application(application, didReceiveRemoteNotification: userInfo, fetchCompletionHandler: completionHandler)
    }
}
Prompt users as soon as the app is launched by adding code to the application:didFinishLaunchingWithOptions method of your app delegate. We recommend you move this code to a more suitable place in the user journey later you're done setting up WonderPush.
func application(_ application: UIApplication, didFinishLaunchingWithOptions launchOptions: [UIApplication.LaunchOptionsKey : Any]? = nil) -> Bool {
        WonderPush.application(application, didFinishLaunchingWithOptions: launchOptions)

        // TODO: Move this in a more suitable place in the user journey.
      	// Add the following line to prompt push permission
        WonderPush.subscribeToNotifications()
        return true
    }
Make sure to reference that AppDelegate by adding a single line of code in your SwiftUI App struct.
//
//  ExampleApp.swift
//

import SwiftUI
import WonderPush

@main
struct WonderPushExampleApp: App {

    // Make sure to add the following line
    @UIApplicationDelegateAdaptor(AppDelegate.self) var appDelegate

    var body: some Scene {
        WindowGroup {
            ContentView()
        }
    }
}
Update the service extension
Regardless of whether you are using Storyboard or SwiftUI, we'll modify the code of the Notification Service Extension you created in Step 3.
Replace the whole contents of NotificationService.swift or (NotificationService.h and NotificationService.m for Objective-C) with :
import WonderPushExtension

class NotificationService: WPNotificationServiceExtension {

    override class func clientId() -> String {
        return "YOUR_CLIENT_ID"
    }

    override class func clientSecret() -> String {
        return "YOUR_CLIENT_SECRET"
    }

}
#import <WonderPushExtension/WonderPushExtension.h>
@interface NotificationService : WPNotificationServiceExtension
@end#import "NotificationService.h"
@implementation NotificationService
+ (NSString *)clientId {
return @"YOUR_CLIENT_ID";
}
+ (NSString *)clientSecret {
return @"YOUR_CLIENT_SECRET";
}
@endOnce again, adapt YOUR_CLIENT_ID and YOUR_CLIENT_SECRET with the values you've noted above, the same you just gave to your AppDelegate.
Receive your first push!
Build & run your application and get the permission prompt you've configured:\ 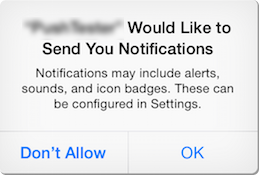
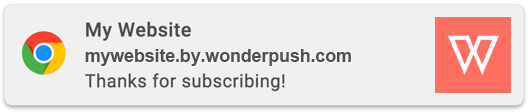
Wait a couple of minutes and receive the default welcome notification:
Congratulations, you're done!
Updated 12 months ago