
Troubleshooting iOS
Common issues on iOS.
Activate logging when troubleshootingYou can activate WonderPush logs by simply calling
WonderPush.setLogging(true)the earliest possible at application startup (ideally inapplication:willFinishLaunchingWithOptions:).Our logs report pretty much the entire activity of our SDK. They are all prefixed with
[WonderPush]so they're easy to filter in and out.Don't forget to turn them off in your release build.
Supported configurations for push notifications
| Device | Distribution mode | Push certificate environment |
|---|---|---|
| Simulator | Xcode | Sandbox / development Note: Only supported for iPhone 14+, on macOS 13+, using Xcode 14+, running on an Apple Silicon Mac or a Mac with a T2 security chip. |
| Physical device | Xcode | Sandbox / development |
| Physical device | TestFlight | Production |
| Physical device | In-house / Enterprise | Production |
| Physical device | AppStore | Production |
Submitting your app to the AppStore
My app got a warning while submitting to the AppStore: ITMS-91053: Missing API declaration
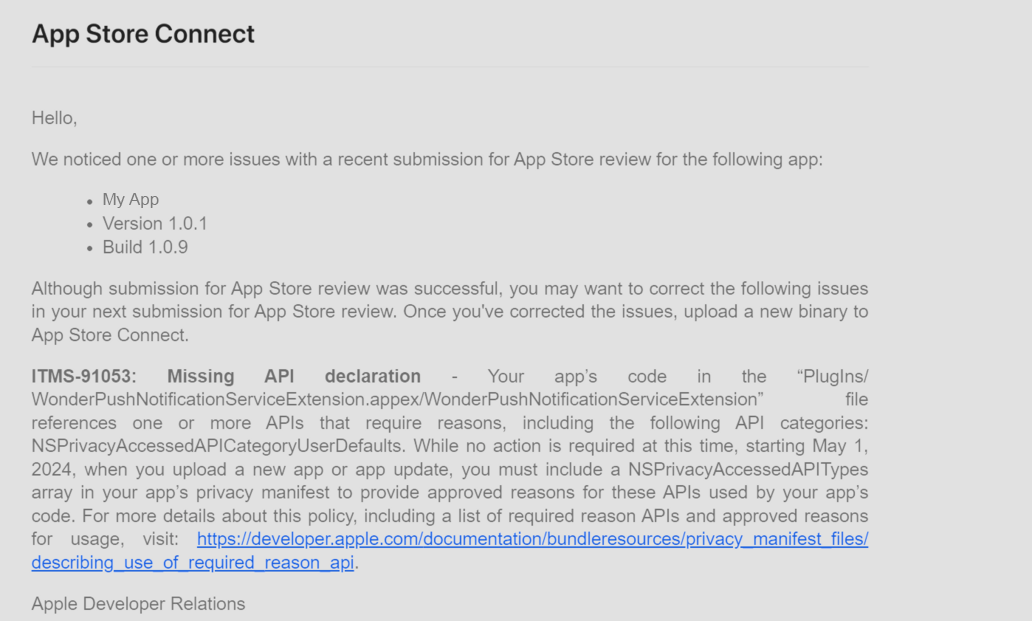
Before May 1, you might get this warning from the AppStore due to a new Apple policy. After May 1, this will prevent you from submitting your app.
We have released the following SDK to address this problem:
- v4.3.1 of our iOS SDK
- v3.3.2 of our Cordova SDK
- v2.3.10 of our Flutter SDK
- v.2.3.0 of our ReactNative SDK
Be sure to upgrade before you submit your app to the AppStore after May 1.
Alternatively, you can add the following to both your application and your notification service extension Info.plist file:
	<key>NSPrivacyAccessedAPITypes</key>
	<array>
		<dict>
			<key>NSPrivacyAccessedAPIType</key>
			<string>NSPrivacyAccessedAPICategoryUserDefaults</string>
			<key>NSPrivacyAccessedAPITypeReasons</key>
			<array>
				<string>CA92.1</string>
			</array>
		</dict>
	</array>
Push credentials
Creating or using an Apple Push Notification service (APNs) Key
Get your Apple key with the Apple Push Notifications service (APNs) service enabled. You can list your existing keys here. Simply check the Enabled Services and note the Key ID as well as the Team ID displayed below your name in the top-right corner.
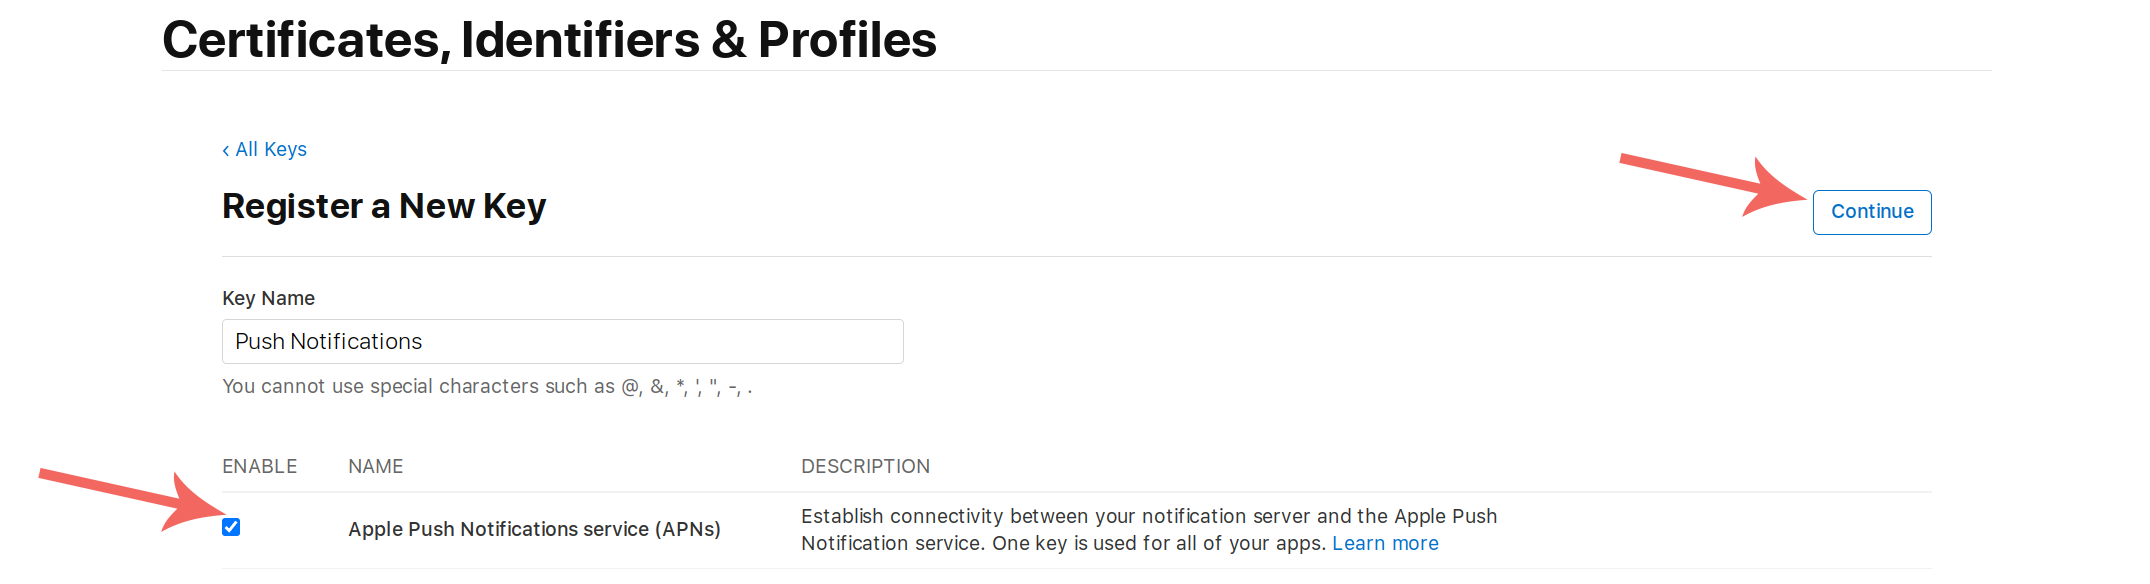
If you don't have one, here's how to create one. In a few words, head to the Apple developer website, go to Accounts, then click on Keys in the Certificates, Identifiers & Profiles column, and click the + button on the top left to add a new key.
Check Apple Push Notifications service (APNs), then click Continue:
If instead you see the following red message, this means that you should instead reuse an existing key. As Apple will not let you download the key again after its registration, you will need to use for the .p8 file that you downloaded at that time.

How should Apple keys be managed for the Apple Push Notifications service (APNs)Apple imposes a maximum of 2 keys simultaneously valid for the Apple Push Notifications service (APNs). Such keys are valid for all applications (Bundle ID or App ID) on your account (Team ID).
Limiting to 2 keys enables you to have one key used for all your push notification needs across all your WonderPush projects (you'll need to upload the same key for each of your projects) or even push providers, and perform a rolling replacement of your key with no downtime.
You would create a second key, temporarily having 2 valid keys at a time, replace every WonderPush project or services that need to send push notifications, and finally revoke the previous key, leaving you again with a single existing key.
In the next screen click Register.
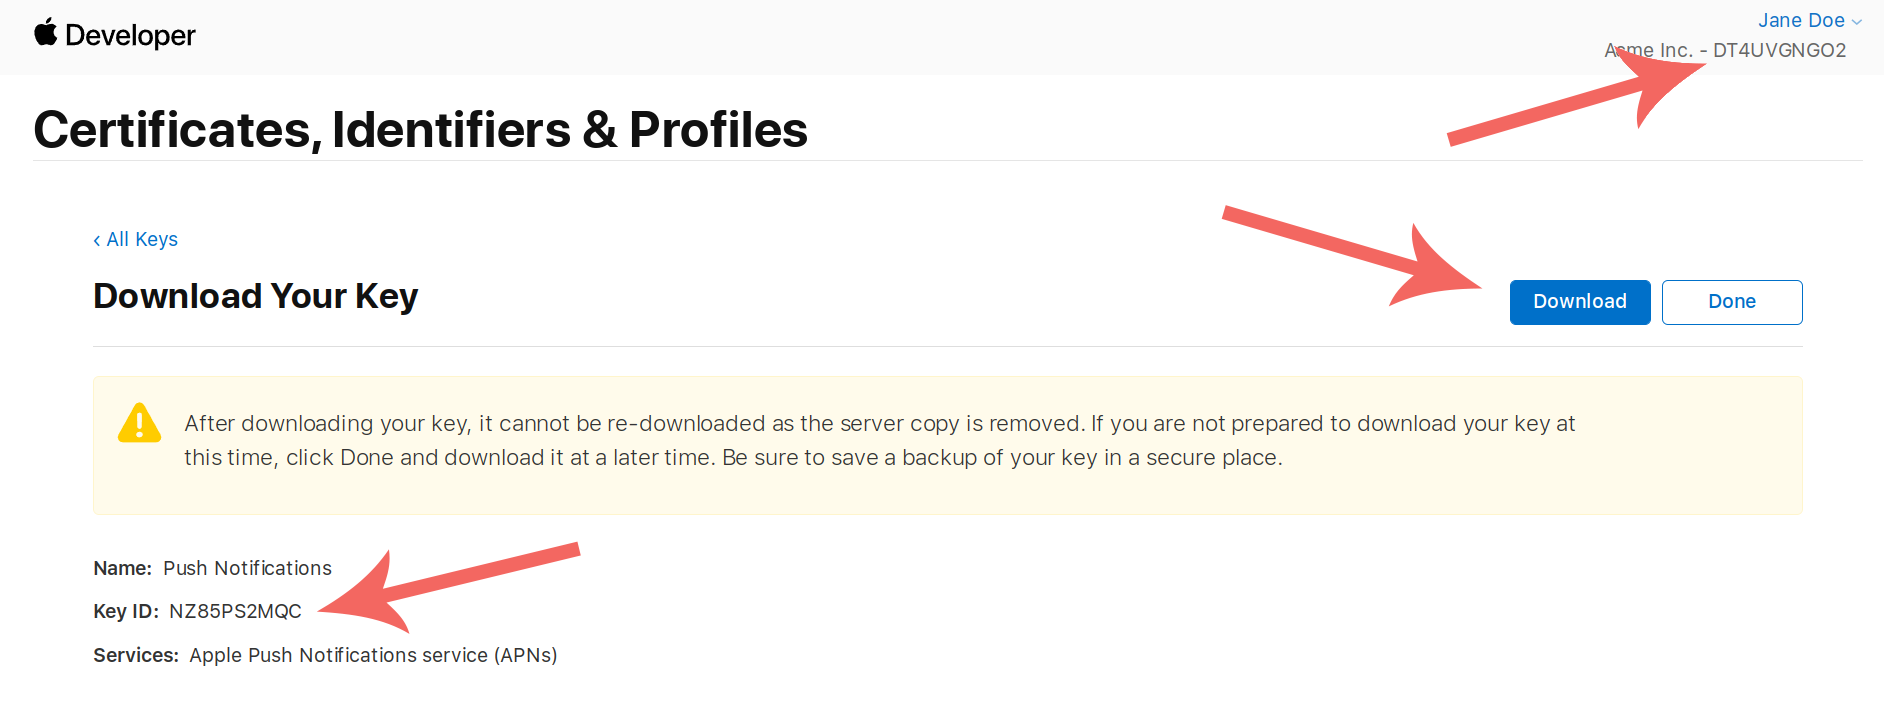
In the next screen, note your Key ID, and your Team ID in the top right corner.
Then click Download. Please do keep this.p8 file in a secure location (see the above callout about key management.)
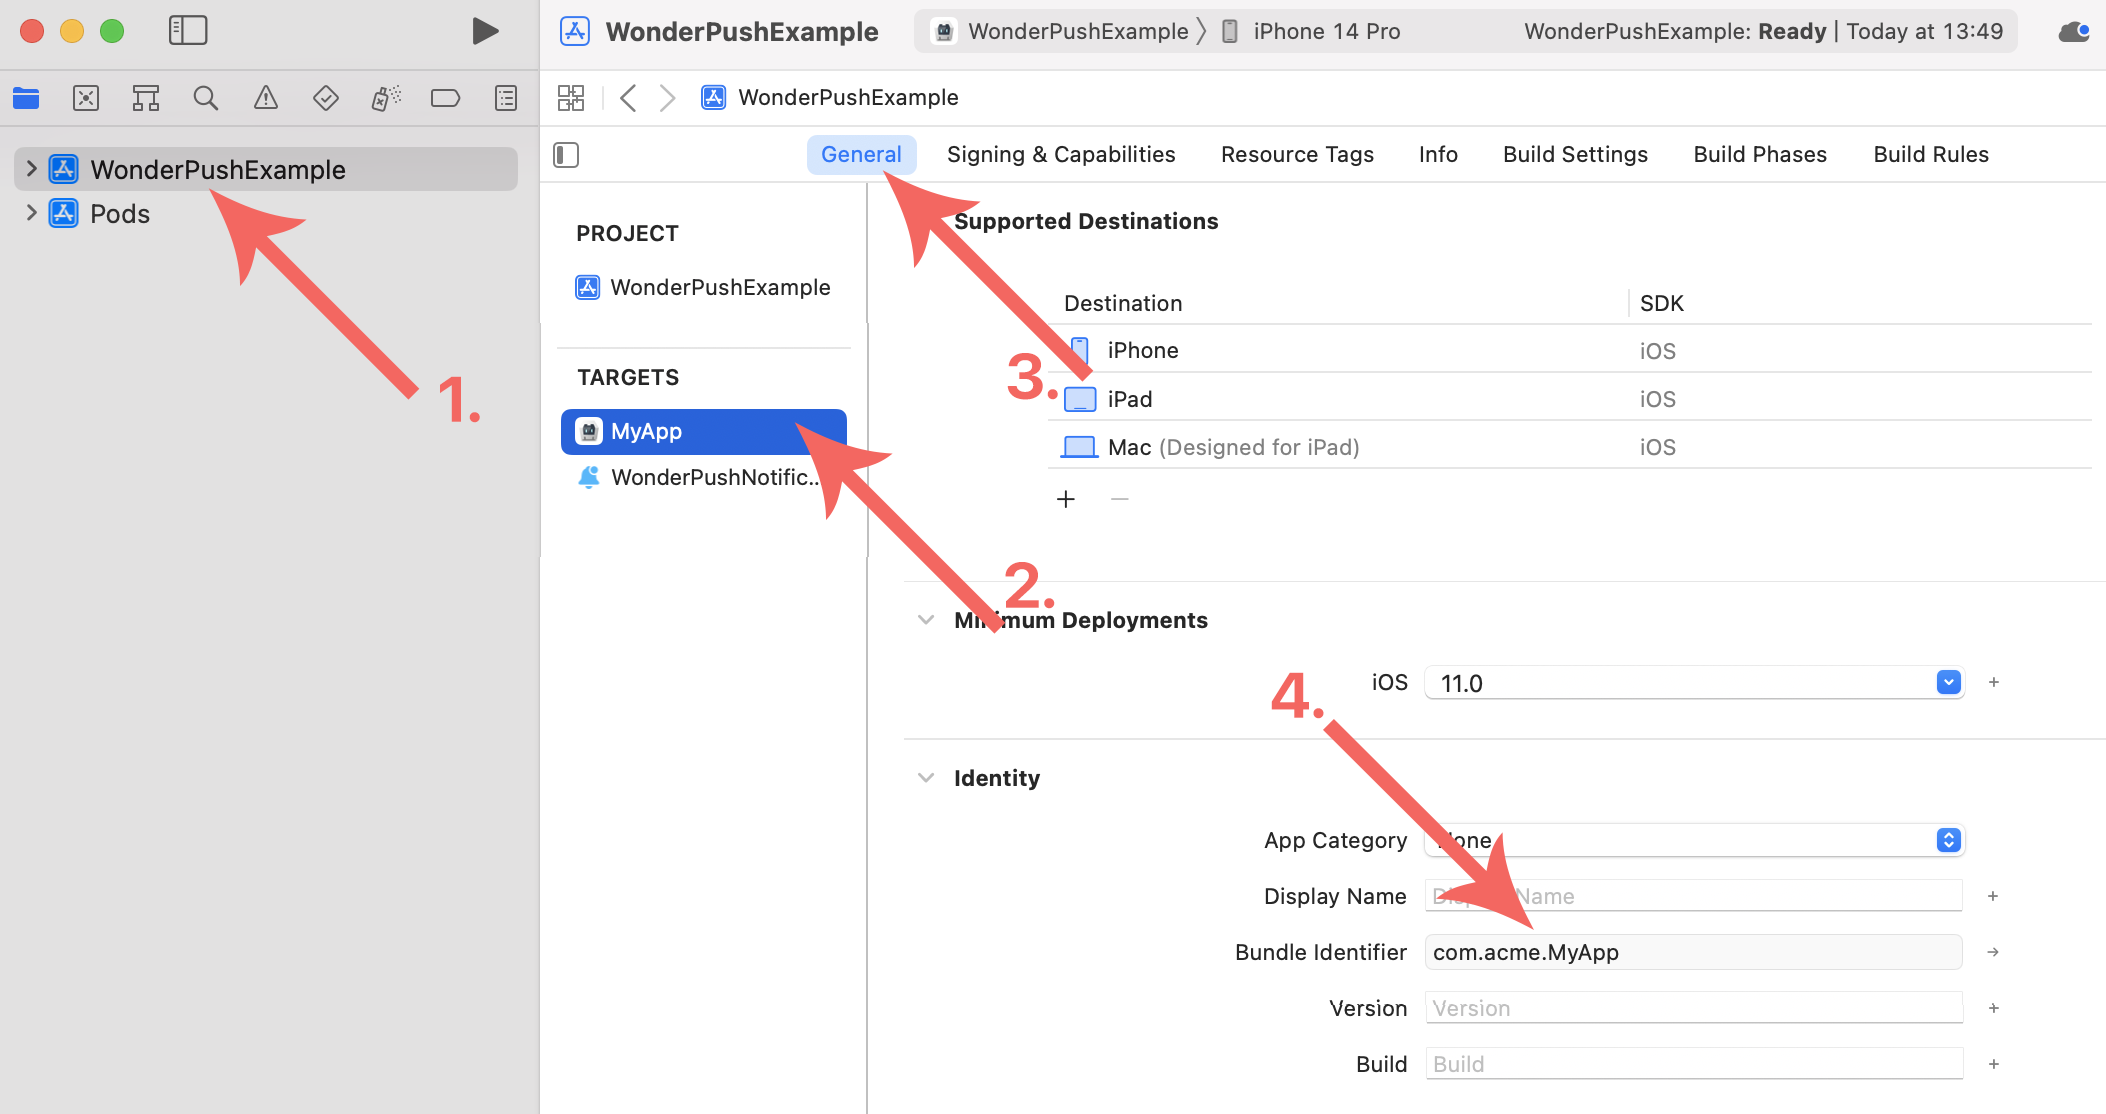
You will then need to know your Bundle ID:
- Open your project in Xcode
- Click on your project in the file browser on the left
- Click on your app target in the list
- Open the General tab
- Your Bundle identifier (aka Bundle ID) is in the Identity section
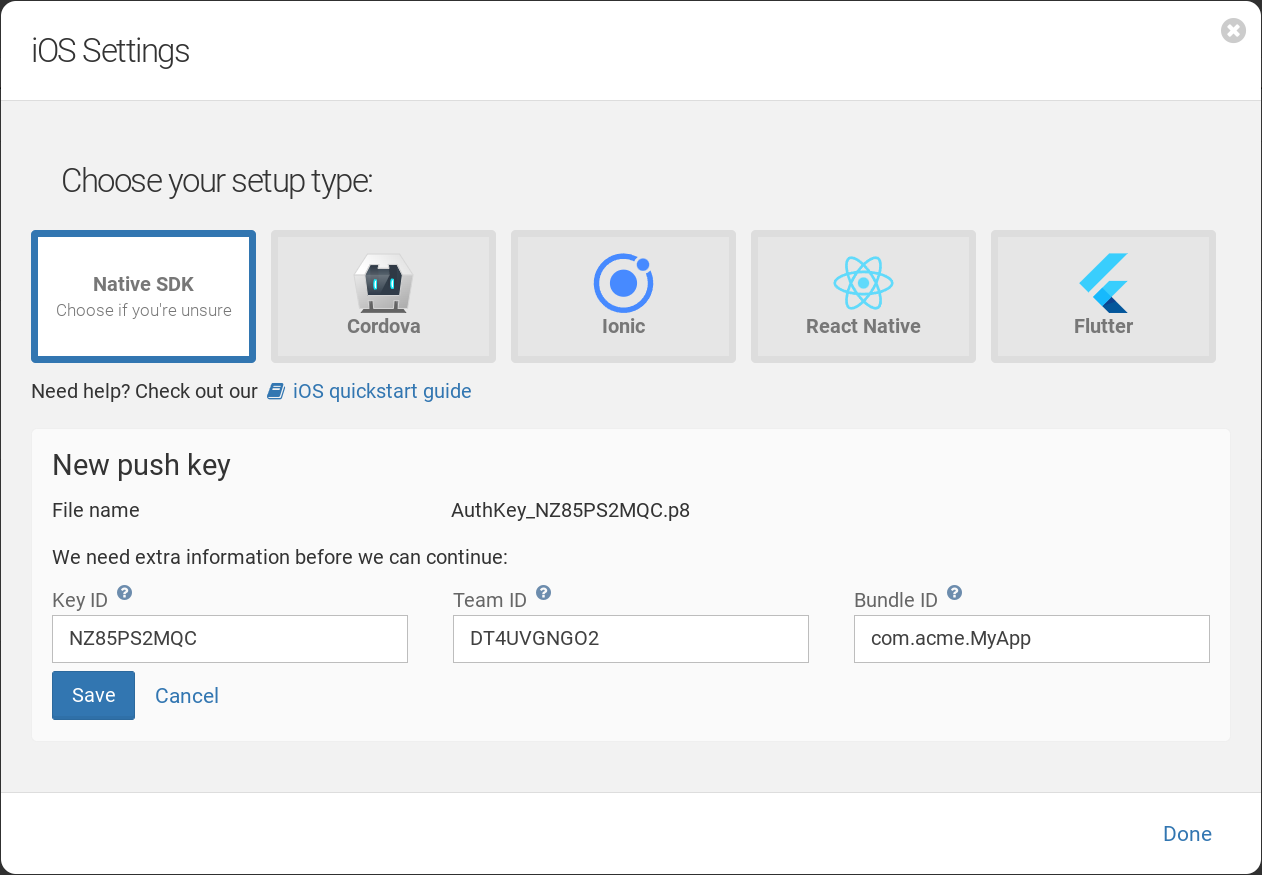
Now go to Settings / Platforms, click the iOS application section title and fill drop your .p8 file:
- Fill the Key ID, Team ID and Bundle ID if necessary. Check their values if they are pre-filled.
- Click Save.
Rotating an Apple Push Notification service (APNs) Key
Check out the list of active keys on Apple's website.
You can have only 2 keys at any given time with the Apple Push Notification service (APNs) active.
So before you start the process of rotating your keys, make sure you have only one key. If not, identify the key you would need to revoke and check it is not used in any of your WonderPush projects, any other push service.
Then you can create a new key as described above, upload it to all of your WonderPush projects, wait 5 minutes for the propagation and finally revoke your previous key on Apple's website.
Creating or renewing an iOS Push certificate
Prefer using Keys instead of CertificatesKeys, unlike Certificates, do not expire. Say good bye to this yearly routine and the risk of forgetting about it!
Using Keys is much simpler than properly generating and exporting a Certificate.
One Key can be used for all of your applications.
Also some features like Live Activities will not be available when using a Certificate.
Follow this comprehensive article from Apple Developer Account Help: Communicate with APNs using a TLS certificate.
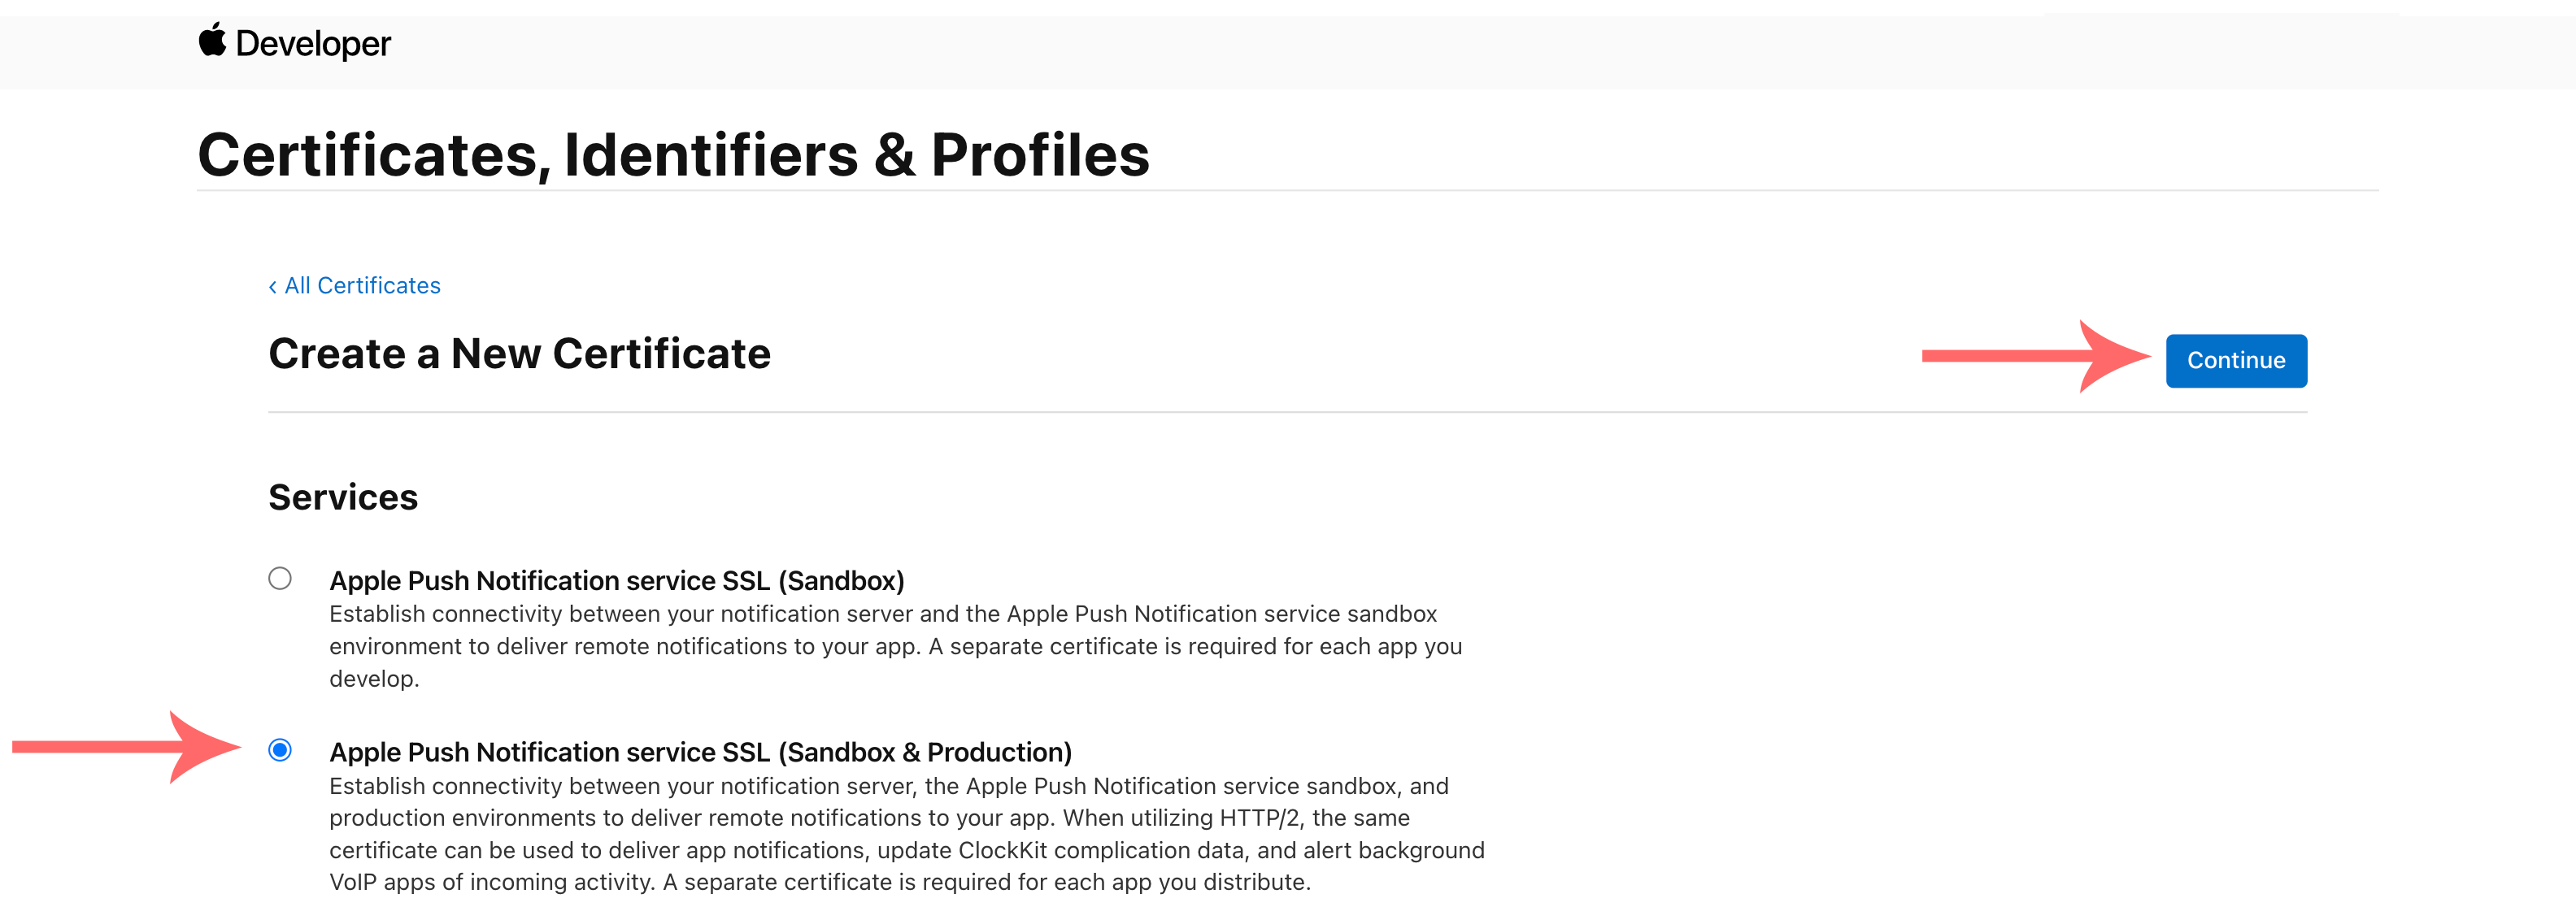
Head to the Apple developer website, go to Accounts, then Certificates, Identifiers & Profiles and click the plus button to add a new certificate. Choose the type Apple Push Notification service SSL (Sandbox & Production):
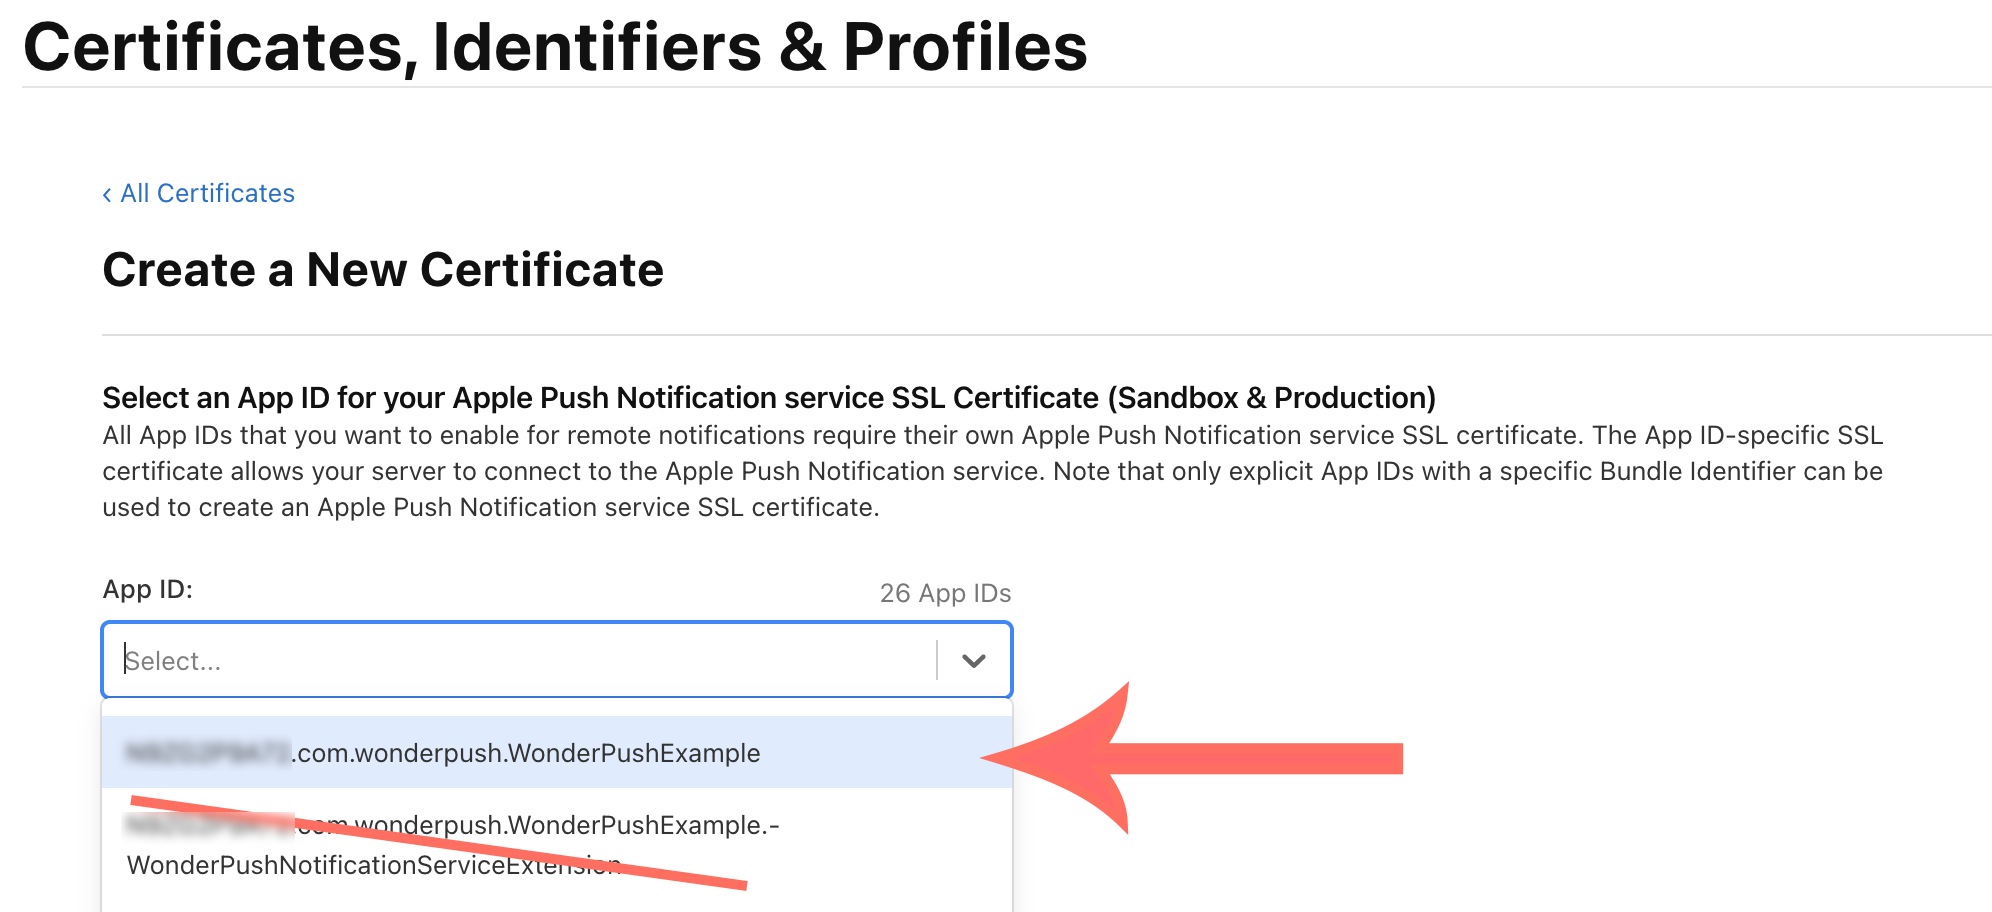
Then select the App ID corresponding to your application, and not the Notification Service Extension:
Follow the rest of the wizard to download your certificate, and open it so it shows in Keychain Access.
We now have to properly export it along its private key before uploading them in the WonderPush dashboard.
- Launch Keychain Access on the Mac where you created the certificate request.
- In the Category section, select My Certificates.
- Find the newly created certificate and expand its content by clicking on the triangle icon.
You’ll see both a certificate and a private key.
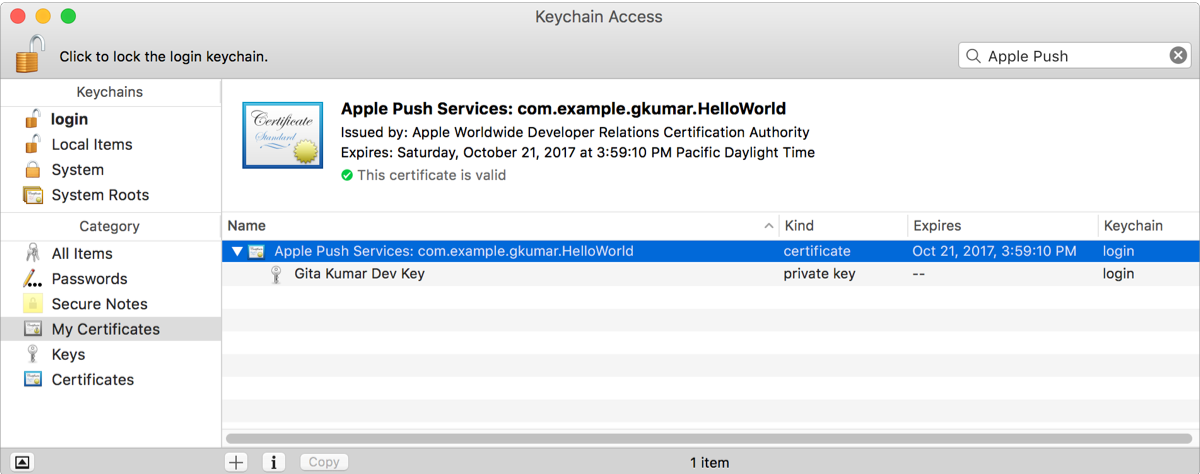
- Select both the certificate and the key, and choose File > Export Items.
- From the File Format pop-up menu, ensure P12 is selected.
- Enter a filename in the Save As field, then click Save.
The certificate and key are saved to the location you specified as a.p12file.
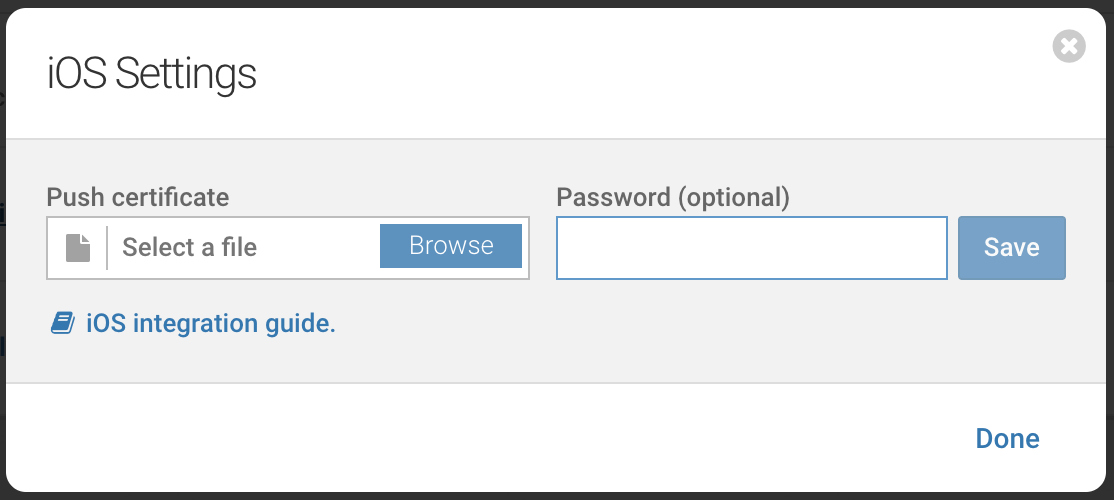
Go to Settings / Platforms, click the iOS application section title and fill in:
- your push certificate by clicking the Browse button,
- the push certificate password if appropriate.
Notification display issues
Notifications not shown at all
When a notification is received, WonderPush will add log entries. You can tell when a notification is received by searching the string
userInfoin WonderPush logs.
If your device is connected to the Internet via an enterprise network, chances are you are behind a Firewall. Apple push notification service, the technology behind iOS push notifications, requires ports 5223, on IPs 17.0.0.0/8 to be open for notifications to be delivered. More information.
If the notification is received but not displayed:
- make sure it isn't a silent notification,
- make sure its
Textfield isn't empty, - make sure its payload's
aps.alert.bodyproperty has a value.
If the notification is not received and the logs are empty:
- make sure you have a valid push certificate,
- if you are deploying via Xcode, make sure the push certificate is valid for the sandbox environment,
- if you are deploying a production build, make sure the push certificate is valid for the production environment,
- find your
installationIdin the logs and make sure it is part of your notification target, - finally, make sure your notification get sent by observing its number of Notifications sent on the notification detail page.
If you are still experiencing issues, please let us know by chatting with us.
Notification has no Image
- Verify the URL of the image by opening it in a web browser. The image should be displayed.
- Make sure the URL is a direct link to the image, not an HTML page.
- Make sure the URL of the image is HTTPS. If the URL is HTTP, make sure it is allowed by App Transport Security.
- Make sure there is no redirect by pasting the URL in a web browser and verifying the URL doesn't change when the image is displayed.
- Make sure you've correctly added the Notification Service Extension as described in the quickstart guide
- Make sure the Notification Service Extension's Deployment target is
iOS 10.0.
Video content is not playing
Check every item of the Notification has no image section as if your video was an image. In addition, also check the following:
- Make sure your video content is within the iOS size limitations.
- Make sure your video format is supported by iOS by opening the URL of your video in Safari on an iOS device.
Confirmed receipt is not working in iOS simulator when using "Preview on test users"
While confirmed receipts should work fine on a real device in any scenario, they do not work in the Simulator when choosing "Preview on test users". This is an Apple issue with the Simulator implementation (the content-available: 1 entry of the push payload does not wake the app as it should in the Simulator).
Firebase conflicts
Notification clicks not shown on dashboard, universal links not working
If your iOS app ships with Firebase, make sure Firebase's AppDelegate proxy is disabled by setting FirebaseAppDelegateProxyEnabled to NO in your MyApp-Info.plist file, as explained in the Firebase documentation.
Make sure you have implemented application(continue userActivity, restorationHandler) in your AppDelegate. If you are using SceneDelegate instead, make sure to forward the calls from AppDelegate to you SceneDelegate like this:
func application(_ application: UIApplication, continue userActivity: NSUserActivity, restorationHandler: @escaping ([UIUserActivityRestoring]?) -> Void) -> Bool {
  if let scene = UIApplication.shared.connectedScenes.first, let sceneDelegate = scene.delegate as? SceneDelegate {
    sceneDelegate.scene(scene, continue: userActivity)
  }
  restorationHandler([])
  return true
}
If you're using SwiftUI, you can also use the .onContinueUserActivity of any SwiftUI view, like this:
.onContinueUserActivity(NSUserActivityTypeBrowsingWeb, perform: { activity in
            if let url = activity.webpageURL {
              // Handle universal link
            }
        })
Swift UI
The setupDelegate method is not compatible with SwiftUI
setupDelegate method is not compatible with SwiftUICalling WonderPush.setupDelegate(for: application) in your initialization code will result in the following error:
Could not cast value of type 'WPAppDelegate' to 'SwiftUI.AppDelegate'
At the moment, setupDelegate is not compatible with SwiftUI and you'll have to remove this call and implement the appropriate UIApplicationDelegate methods as explained in the setupDelegate documentation.
Xcode errors
Automatic signing and provisioning profile errors
If you're getting the following error, make sure to set up Automatic Signing for the extension:
Provisioning profile "XXX" has app ID "YYY", which does not match the bundle ID "YYY.WonderPushNotificationServiceExtension".If you use a framework and CI/CD automated build tools, make sure to check your framework's solution for automatically setting provisioning.
After installing Xcode 10.3 I get "Failed to find or create execution context for description..."
You just installed Xcode 10.3 and you get a build error similar to:
Failed to find or create execution context for description <IBCocoaTouchPlatformToolDescription: 0x7fa8bad9a6f0>This worked for us:
sudo killall -9 com.apple.CoreSimulator.CoreSimulatorServiceSee this stackoverflow answer.
When I run my app, I get this warning: Class WP[...] is implemented in both [...]WonderPushExtension.framework[...] and [...]WonderPush.framework[...]. One of the two will be used. Which one is undefined.
Class WP[...] is implemented in both [...]WonderPushExtension.framework[...] and [...]WonderPush.framework[...]. One of the two will be used. Which one is undefined.This runtime warning is harmless. It is due to a known CocoaPods issue that results in the main app target being linked against all pods, including those of the notification service extension.
You can safely ignore this warning, but if you want to remove the annoying log messages, here are a few options:
-
In Xcode, find the
Pods-MyApp.debug.xcconfigandPods-MyApp.release.xcconfigfiles inside thePodsproject in theTargets Support Files/Pods-MyAppdirectory (replaceMyAppwith your app name). Edit both files to remove-framework "WonderPushExtension"from theOTHER_LDFLAGSsetting. This will make the warning go away, but this modification will not survive thepod installcommand. -
You can also move away from CocoaPods and use another installation method for WonderPush. We support Carthage Integration and Manual iOS Integration.
I get that message: WARNING: method swizzling detected!
Some frameworks, including WonderPush, try to become the application delegate. That's what our setupDelegateForApplication is for. When several frameworks try to become the application delegate, all are not always successful.
Here are the two steps to resolve it:
- In your
AppDelegate, stop callingWonderPush.setupDelegate(for: application) - Still in your
AppDelegate, forward the following methods to WonderPush:
func application(_ application: UIApplication, didFinishLaunchingWithOptions launchOptions: [UIApplication.LaunchOptionsKey: Any]?) -> Bool {
  // Override point for customization after application launch.
  WonderPush.application(application, didFinishLaunchingWithOptions: launchOptions)
  return true
}

func application(_ application: UIApplication, didReceiveRemoteNotification userInfo: [AnyHashable : Any]) {
  WonderPush.application(application, didReceiveRemoteNotification: userInfo)
}

func application(_ application: UIApplication, didRegisterForRemoteNotificationsWithDeviceToken deviceToken: Data) {
  WonderPush.application(application, didRegisterForRemoteNotificationsWithDeviceToken: deviceToken)
}

func application(_ application: UIApplication, didFailToRegisterForRemoteNotificationsWithError error: Error) {
  WonderPush.application(application, didFailToRegisterForRemoteNotificationsWithError: error)
}

func application(_ application: UIApplication, didReceive notification: UILocalNotification) {
  WonderPush.application(application, didReceive: notification)
}

func application(_ application: UIApplication, didReceiveRemoteNotification userInfo: [AnyHashable : Any], fetchCompletionHandler completionHandler: @escaping (UIBackgroundFetchResult) -> Void) {
  WonderPush.application(application, didReceiveRemoteNotification: userInfo, fetchCompletionHandler: completionHandler)
}

func applicationDidBecomeActive(_ application: UIApplication) {
  // Restart any tasks that were paused (or not yet started) while the application was inactive. If the application was previously in the background, optionally refresh the user interface.
  WonderPush.applicationDidBecomeActive(application)
}

func applicationDidEnterBackground(_ application: UIApplication) {
  // Use this method to release shared resources, save user data, invalidate timers, and store enough application state information to restore your application to its current state in case it is terminated later.
  // If your application supports background execution, this method is called instead of applicationWillTerminate: when the user quits.
  WonderPush.applicationDidEnterBackground(application)
}

func application(_ application: UIApplication, didRegister notificationSettings: UIUserNotificationSettings) {
  WonderPush.application(application, didRegister: notificationSettings)
}
- (BOOL)application:(UIApplication*)application didFinishLaunchingWithOptions:(NSDictionary*)launchOptions {
[WonderPush application:application didFinishLaunchingWithOptions:launchOptions];
return YES;
}
- (void)application:(UIApplication *)application didReceiveRemoteNotification:(NSDictionary *)userInfo {
[WonderPush application:application didReceiveRemoteNotification:userInfo];
}
- (void)application:(UIApplication *)application didRegisterForRemoteNotificationsWithDeviceToken:(NSData *)deviceToken {
[WonderPush application:application didRegisterForRemoteNotificationsWithDeviceToken:deviceToken];
}
- (void)application:(UIApplication *)application didFailToRegisterForRemoteNotificationsWithError:(NSError *)error {
[WonderPush application:application didFailToRegisterForRemoteNotificationsWithError:error];
}
- (void)application:(UIApplication *)application didReceiveLocalNotification:(UILocalNotification *)notification {
[WonderPush application:application didReceiveLocalNotification:notification];
}
- (void)application:(UIApplication *)application didReceiveRemoteNotification:(NSDictionary *)userInfo fetchCompletionHandler:(void (^)(UIBackgroundFetchResult))completionHandler {
[WonderPush application:application didReceiveRemoteNotification:userInfo fetchCompletionHandler:completionHandler];
}
- (void)applicationDidBecomeActive:(UIApplication *)application {
[WonderPush applicationDidBecomeActive:application];
}
- (void)applicationDidEnterBackground:(UIApplication *)application {
[WonderPush applicationDidEnterBackground:application];
}
- (void)application:(UIApplication *)application didRegisterUserNotificationSettings:(UIUserNotificationSettings *)notificationSettings {
[WonderPush application:application didRegisterUserNotificationSettings:notificationSettings];
}Debugging the notification extension
To debug the notification extension:
- Activate logging in the notification extension by adding the following code to the
NotificationServiceclass you've created in the quickstart guide:
func loggingEnabled() -> Bool {
  return true
}
- (BOOL) loggingEnabled {
return YES;
}- Open the logging console in Xcode under Window > "Devices and Simulators". Select your device on the left and open the log up arrow at the bottom.
- Send yourself a notification and look for the string
didReceiveNotificationRequestin your device logs.
We do not recommend attaching the debugger to the notification extension, as this can cause the extension to stop working entirely. When this happens, you need to reboot your iOS device.
Notifications have [modified] in the title
[modified] in the titleWhen adding a Notification Service Extension target using Xcode, the sample code shows how to modify the notification by appending [modified] to the title.
Remove this sample code and replace it like instructed in the integration guide.
App Store validation message: Missing Purpose String NSLocationWhenInUseUsageDescription in Info.plist
NSLocationWhenInUseUsageDescription in Info.plistWhen submitting your application to the App Store, you may receive the following message from Apple:
ITMS-90683: Missing Purpose String inInfo.plist* Your app‘s code references one or more APIs that access sensitive user data. The app‘s
Info.plistfile should contain aNSLocationWhenInUseUsageDescriptionkey with a user-facing purpose string explaining clearly and completely why your app needs the data. If you're using external libraries or SDKs, they may reference APIs that require a purpose string. While your app might not use these APIs, a purpose string is still required. For details, visit: https://developer.apple.com/documentation/uikit/protecting_the_user_s_privacy/requesting_access_to_protected_resources
Since our iOS SDK version 4.1.0, we expose a method called triggerLocationPrompt() to help you ask your users the permission to read their location. You can even use it from a rich popup.
The presence of this method makes your compiled application reference the Location API, and Apple validation will catch it and ask you to describe why you use the Location API.
Even if you do not plan on using this feature, Apple will require you to provide a description to be displayed to the user, if ever used. You can write something along the lines of: Enables user experience to be tailored to your location.
Updated 12 months ago