
Events
Event-based segmentation lets you target users based on their journey
What are events?
Events are recorded when interesting things take place in the user journey. Events may contain additional information about what happened. WonderPush stores them for 3 months.
A few common examples of events are:
- user purchased something,
- user read an article,
- user added something to his/her cart.
In WonderPush, you can use events to trigger push notifications and in-apps. You can also create segments based on whether a particular event occurred in a particular timeframe.
Events have:
- a name,
- an optional collection of attributes further describing what happened.
Tracking an event
Tracking an event can be done with a single line of code (adapt EVENT_NAME):
WonderPush = window.WonderPush || [];
WonderPush.push(['trackEvent', 'EVENT_NAME']);WonderPush.trackEvent('EVENT_NAME');WonderPush.trackEvent('EVENT_NAME')[WonderPush trackEvent:@"EVENT_NAME"];WonderPush.trackEvent('EVENT_NAME');WonderPush.trackEvent('EVENT_NAME');WonderPush.trackEvent('EVENT_NAME');For example, tracking events on a website on the click of a button is very easy:
<button onclick="WonderPush.push(['trackEvent', 'EVENT_NAME']);">Click me</button>Event attributes
Events can have optional attributes. Attribute names are prefixed by their type. For example, an attribute containing a string value must have a name that starts with string_. See Format of property names for more detail.
In the following example, we are tracking a purchase event with 2 attributes:
string_category, corresponding to a string describing the category of the product bought, which can help target users that bought a particular type of itemfloat_price, a number containing the price, which will help track users based on the price of what they bought.
window.WonderPush = window.WonderPush || [];
WonderPush.push(function(){
    WonderPush.trackEvent("purchase", {
    	string_category: "trousers",
      float_price: 49.99
    });
});
JSONObject attributes = new JSONObject();
attributes.put("string_category", "trousers");
attributes.put("float_price", 49.99f);
WonderPush.trackEvent("purchase", attributes);WonderPush.trackEvent("purchase", [
"string_category": "trousers",
"float_price": 49.99
]);[WonderPush trackEvent:"purchase" withData:@{
@"string_category": @"trousers",
@"float_price": @(49.99)
}];WonderPush.trackEvent("purchase", {
string_category: "trousers",
float_price: 49.99
});WonderPush.trackEvent("purchase", {
string_category: "trousers",
float_price: 49.99,
});WonderPush.trackEvent("purchase", {
string_category: "trousers",
float_price: 49.99
});Tracking an event in response to a user click on a push notification or in-app
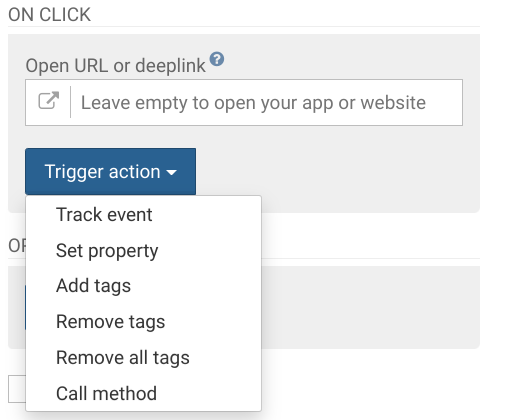
Just head over to the On click actions section of the Create/edit notification page and choose Trigger action and Track event for the notification itself or for any button.
The same can be achieved when users click on the buttons of in-apps, see Handling in-app clicks.
Tracking an event using the REST API
Tracking events using the REST API is not the preferred way to track events because those events will not be able to trigger in-apps. They can only be used for targeting users with push notifications.
This is achieved using the /events call of our REST API.
Creating segments based on events
You can add event-related criteria to segments by choosing User event in the segmentation form. See the segments documentation for more on creating segments.

This form will allow you to target users based on the events they did or didn't generate in a specific timeframe or in their lifetime.
Triggering push notifications when an event occurs
You can trigger a push notification automatically whenever a user performs an event, after a certain delay, directly from the push notification editor. This is explained in detail in the push notification editor documentation.

Example of a push notification programmed to be sent 15 minutes after users make a purchase, unless they cancel their order.
Built-in events
WonderPush automatically keeps track of a number of events. They are called built-in events and they share one important characteristic: their name all start with the@ character.
Here's all WonderPush built-in events:
| Event name | Description |
|---|---|
@APP_OPEN | This event represent the beginning of a user session. It occurs whenever users hit your app/website and their last interaction is older than 30 minutes (15 minutes if they are clicking on a notification). subtype dimension can take a few values:
|
@NOTIFICATION_SENT | This event occurs whenever a notification is sent to a user. Please note that not all notifications are delivered. |
@NOTIFICATION_CAPPED | This event occurs whenever a notification was not sent to a given user in order to respect the imposed pressure. |
@NOTIFICATION_FAILED | This event occurs whenever we try to send a notification and fail. Common failure reasons are:
|
@NOTIFICATION_OPENED | This event occurs when a users clicks a notification, or a notification button (except the dismiss button). |
@PRESENCE | This event occurs whenever users browse your app/website or leave. |
@OPT_IN | This event occurs whenever a user becomes a subscriber by signing up for push notifications. In the Detailed Analytics API endpoint, thesubtype dimension can take a few values:
|
@OPT_OUT | This event occurs whenever a users opts out of push notifications. See Soft opt-out for a detailed explanation of how opting out works. In the Detailed Analytics API endpoint, thesubtype dimension can take a few values:
|
@INAPP_VIEWED | This event occurs whenever a user sees a popup. |
@INAPP_CLICKED | This event occurs whenever a user clicks on a popup button. Mere popup dismissal without meaningful interaction does not result in this event being tracked. This event is only tracked once per popup. |
@INAPP_ITEM_CLICKED | This event is tracked whenever a user clicks on a specific popup button. Multiple of such event can arrise throughout the user interaction with the popup. |
Updated 12 months ago