
Subscription Prompts
SETUP - Ready-made user interfaces to help you subscribe users to push notifications
Getting users to subscribe to push notifications is an important aspect of setting up push notifications. In this document we present ready-made user interfaces we've created to help you do just that with minimal effort.
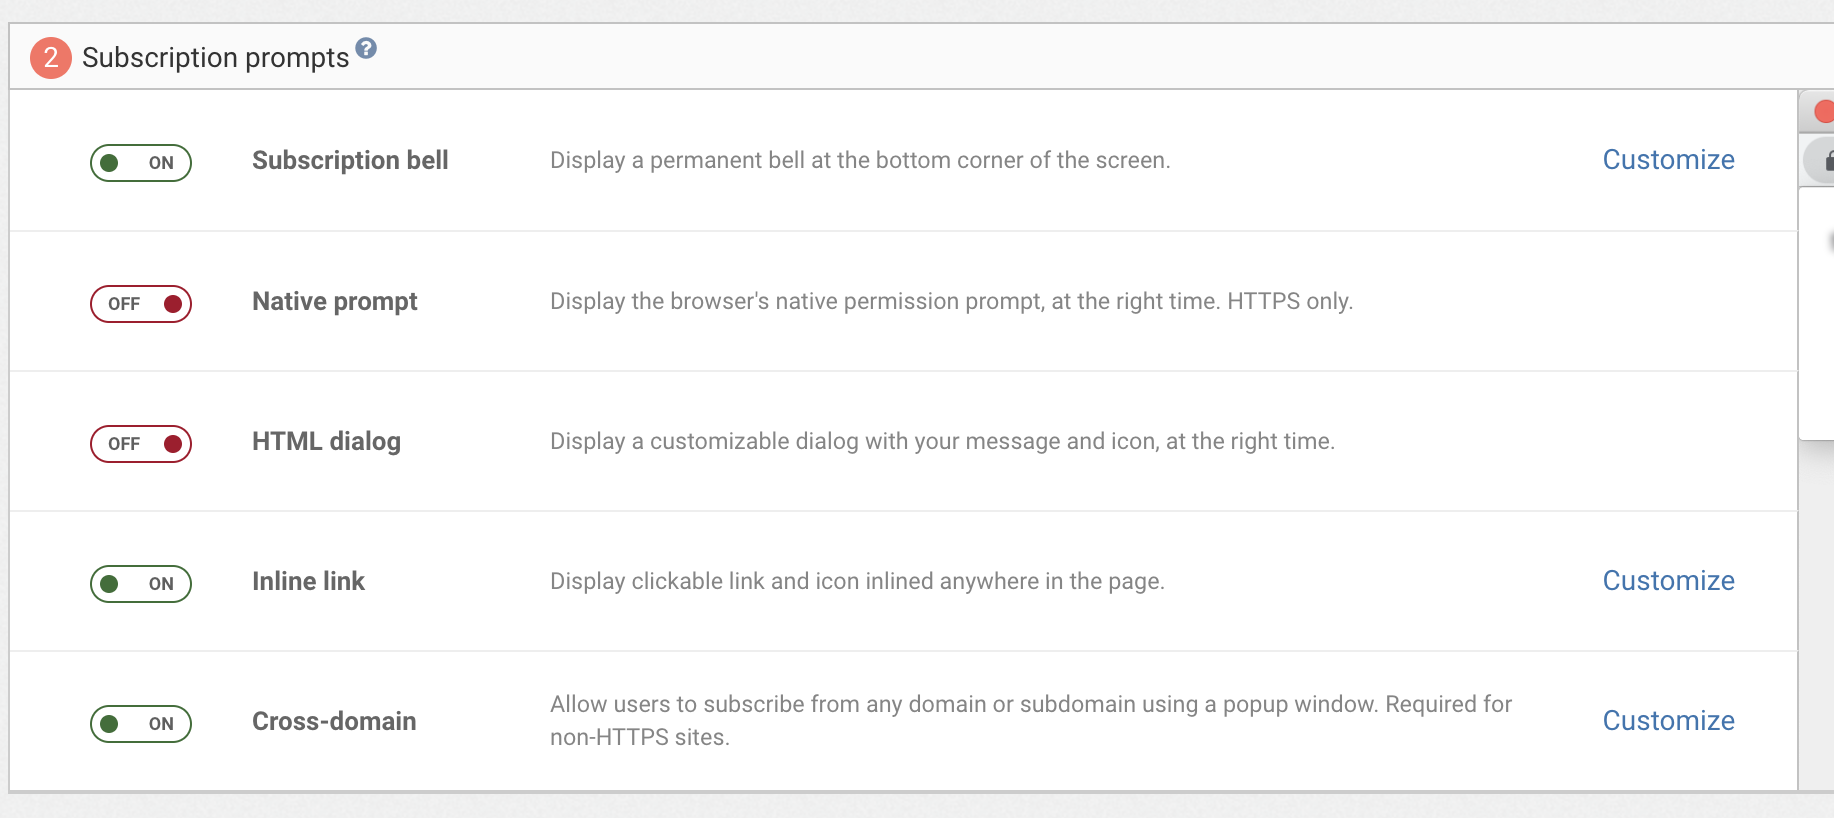
These user interfaces are:
- a widget with a “bell” icon that stays available at the bottom left of the page,
- a native prompt that appears under conditions determined by you,
- an HTML dialog that can be customized and appears under conditions determined by you,
- an inline link that you can insert automatically inside elements matching a CSS selector and customize its texts and icon,
- a cross-domain popup window you can use to subscribe users from another domain,
- a switch you can place anywhere on the page.
While the subscription dialog and the bell widget can be completely configured from your dashboard, the switch require a little bit of code.
For even more flexibility and customization, you can use Push subscription popup to trigger subscription prompts at the right moment in the user journey.
You can customize the promps in the Website settings screen.
Deciding where on your site to show each prompt
All subscription prompts (except the Cross-domain dialog) let you choose on which URLs they appear.
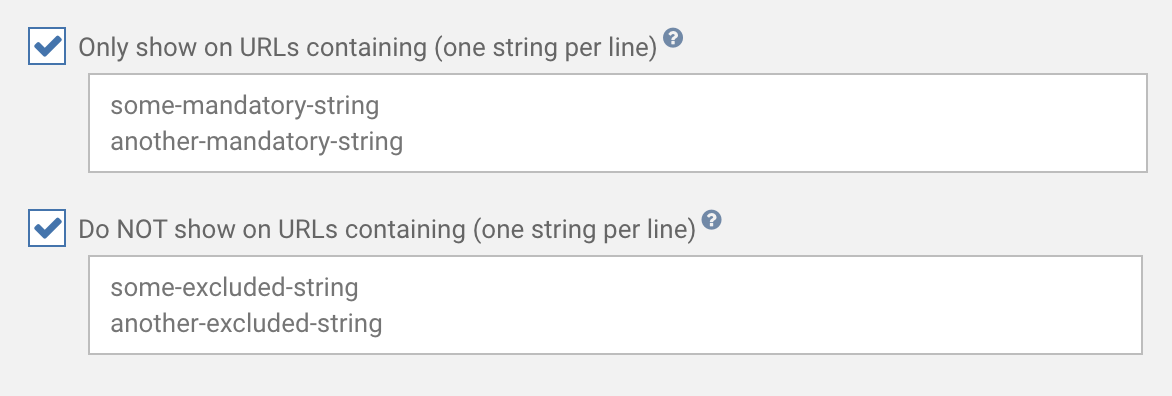
Only show on some URLs
When you check "Only show on URLs containing...", you restrict the prompt to URLs that contain at least one of the lines in the textarea.
For example, if you only show on URLs containing:
/products/
/categories/
Then the prompt will only appear on pages that have /products or /categories in their URL. Typically not your homepage, or terms and conditions page.
Do NOT show on some URLs
When you check "Do NOT show on URLs containing (one string per line)", you restrict the prompt to URLS that do NOT contain ANY of the lines in the textarea.
For example, if you do not show on URLs containing:
/terms/
/contact/
Then the prompt will appear on all pages of your website, except those that have /terms/ or /contact/ in their URL. Typically your terms and conditions page, and your contact page.
Combining "Only show..." and "Do NOT show"
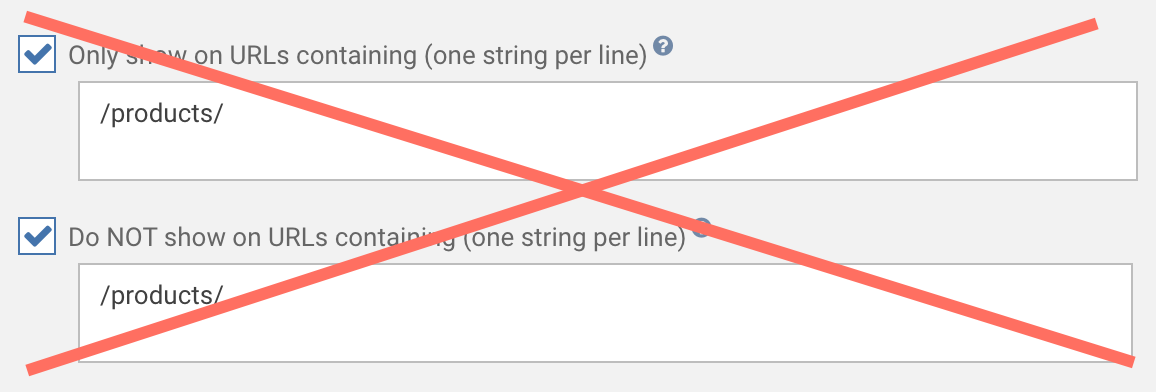
You can put things in both textarea, they will combine. Be careful to avoid putting the same strings inside both textareas: your prompt would never appear.
Do not do this:
On the other hand, this is fine:
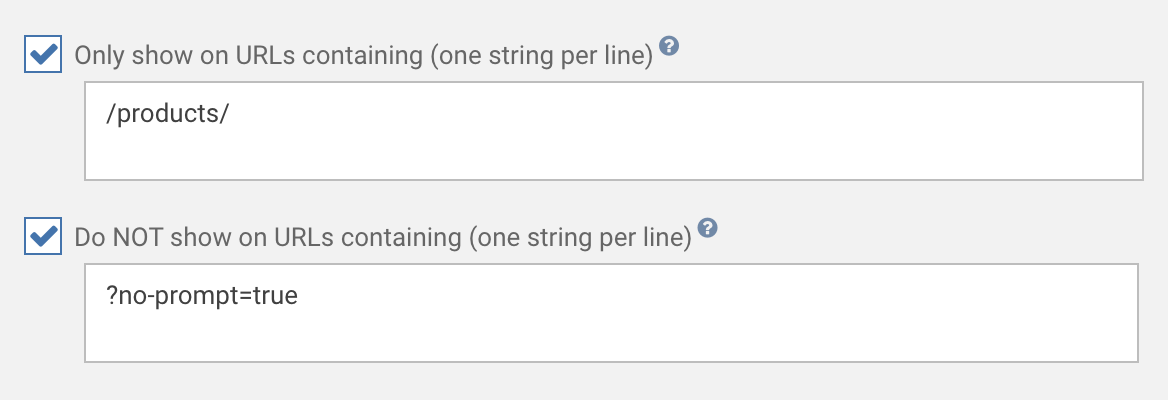
In the above case, this URL would show the prompt:
https://www.mysite.com/products/pants.html
And this wouldn't:
https://www.mysite.com/products/pants.html?no-prompt=true
Custom button click
You can have any HTML button or link prompt for push notification permission. This is easily achieved by adding a simple onclick attribute like this:
<a href="#" onclick="WonderPush.subscribeToNotifications(event); return false;">Click me to subscribe</a>Subscription bell widget
The subscription bell widget is the easiest way to subscribe users. Users can use the subscription bell to:
- Subscribe to push notifications
- Opt out of push notifications
- Download personal data
- Clear personal data
The subscription bell sits at the bottom left or right corner of the page and looks like this:\ 
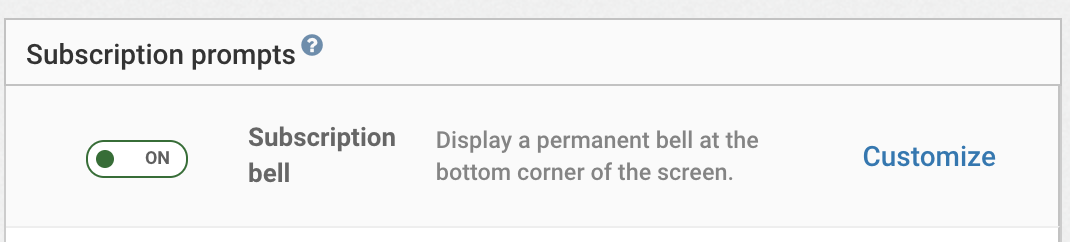
Basic setup
You can configure it directly from your dashboard: go to Settings / Website and make sure the subscription bell is active:
General settings
To customize the subscription bell, click the Customize link.
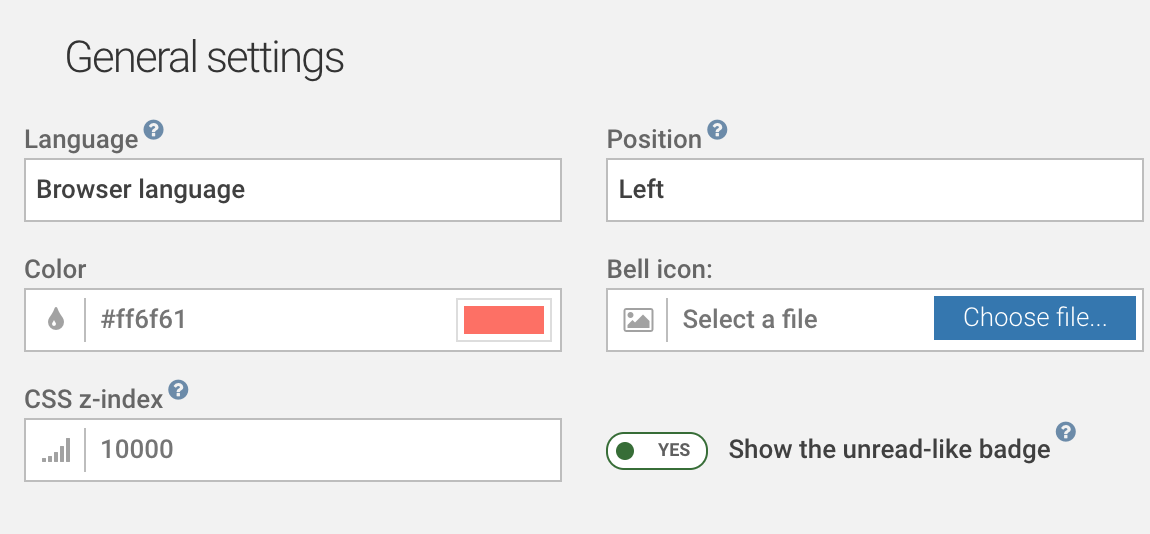
Language
The subscription bell natively supports English and French and will switch automatically to the most appropriate based on the browser language. To force to a particular language, choose one here.
Position
By default the bell is displayed on the lower-left corner of the screen. Use this dropdown menu to set the position on the lower-right corner.
Color
Controls the color of the subscription bell widget.
Bell icon
Use this to change the bell icon. The file you provide will be used as a mask so it must be transparent.
CSS z-index
Controls the “altitude” of the bell widget on the page. Raise this value if something on the page is displayed on top of the bell.
Show unread-like badge
When this is active, the bell will display an unread-like count until the user places his mouse over the bell.
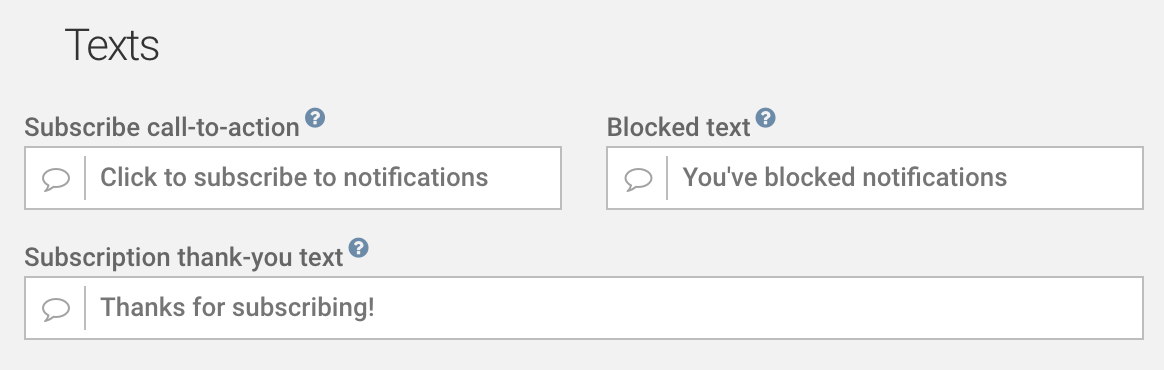
Texts
Use this section to customize the texts displayed by the bell widget.
Unsubscription dialog
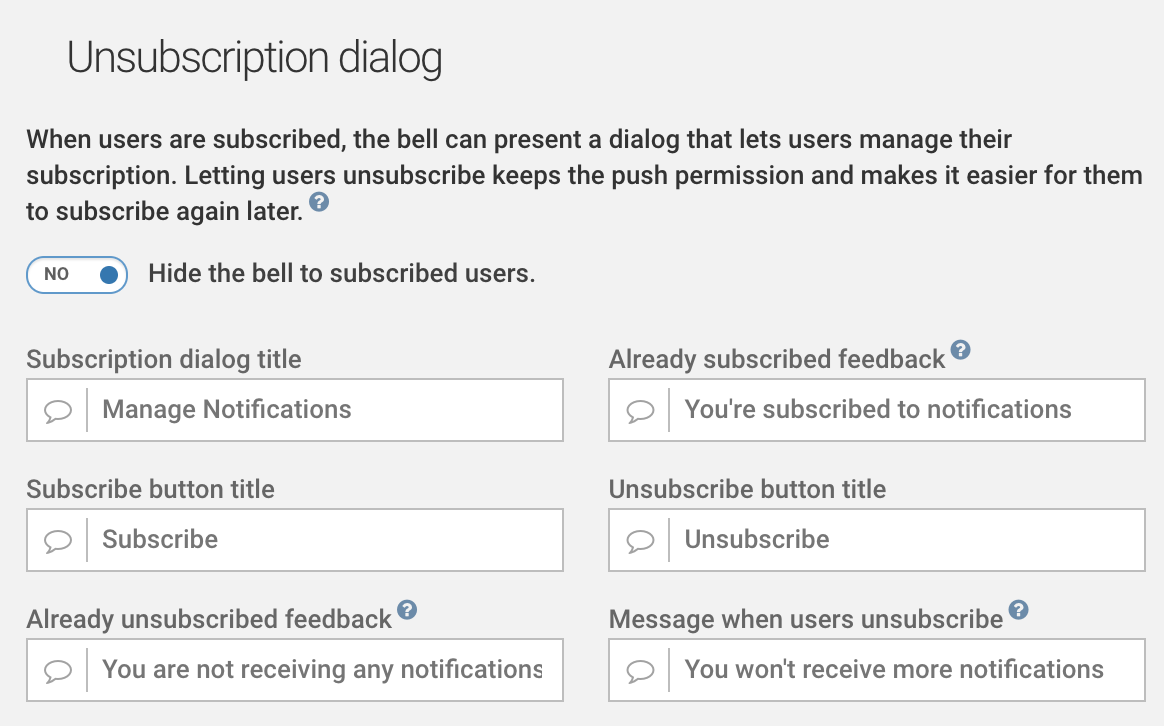
The bell widget allows users to unsubscribe without losing the push permission. This allows them to sign-up again easily later. If you do not wish to let the bell unsubscribe users, check “Hide the bell to subscribed users”.
Other settings in this section let you customize the texts that appear in the unsubscription dialog.
Privacy settings
The bell lets users download or clear their WonderPush data.
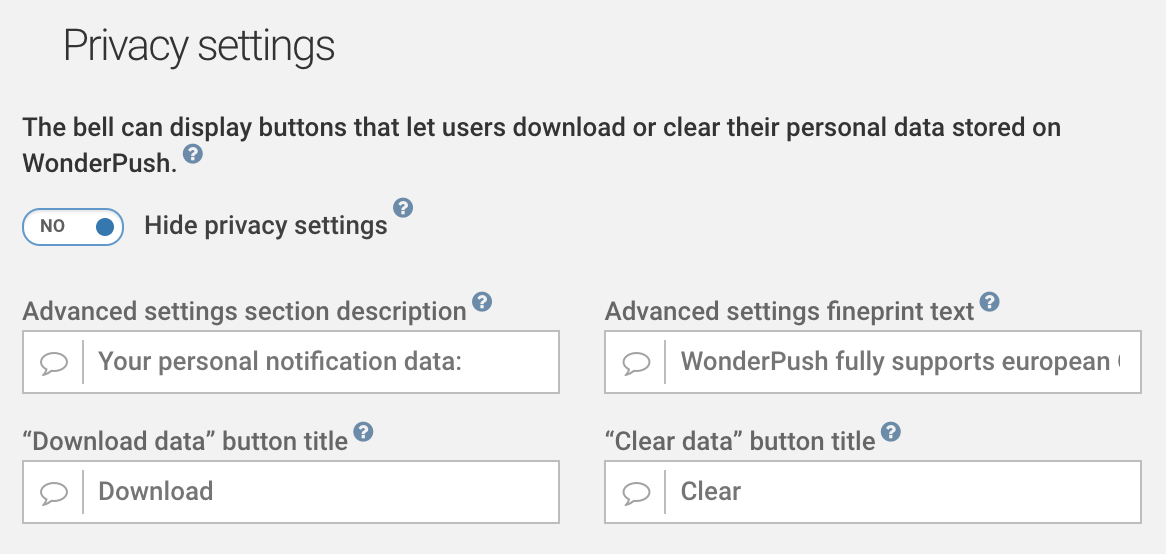
If you do not wish to display these privacy settings, check “Hide privacy settings”.
Internationalization
The bell natively supports English and French. To support another language, you can use the above settings: they let you customize all the texts used by the bell widget.
You can also use the subscription bell init options to support more than one extra language.
Native prompt
This native dialog is the most straightforward way to let users subscribe. To setup the native dialog, make sure it is active in Settings / Website:

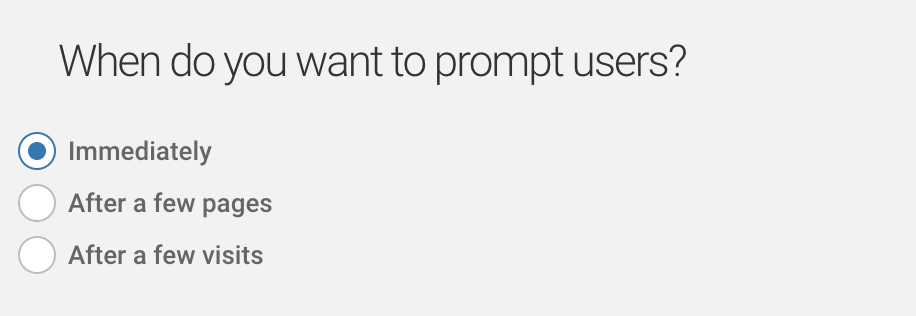
The native prompt cannot be customized but you can choose when it appears by clicking on Customize and choosing a schedule:
HTML dialog
The HTML dialog is an efficient way to subscribe users. It is configured directly from your dashboard.
The subscription dialog looks like this:

To activate the HTML dialog, go to Settings / Website and make sure the HTML dialog is active:

To customize the HTML dialog, click on the Customize link.
Showing the dialog automatically
The dialog shows automatically based on the criteria you specify in your dashboard:

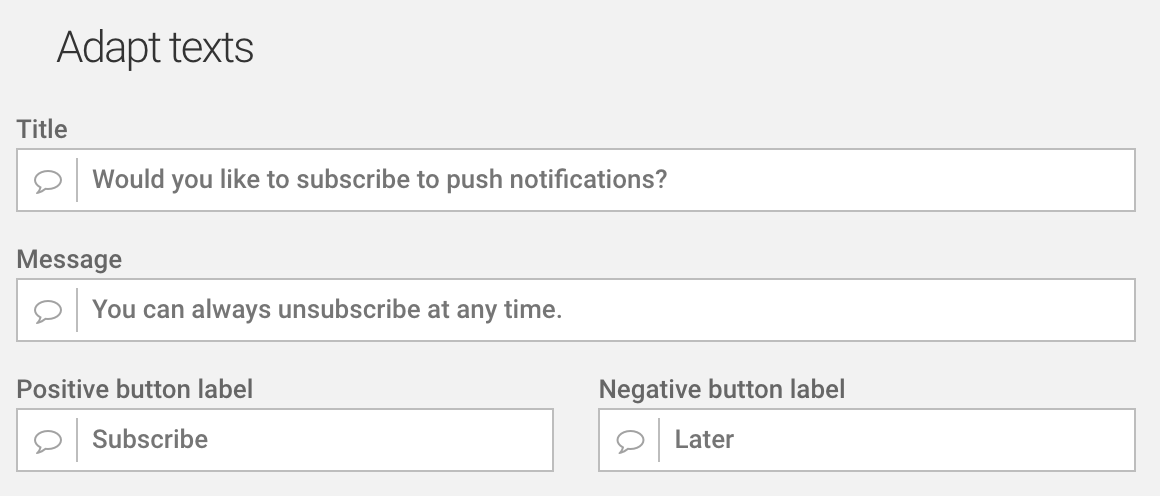
Customizing the dialog content
You can customize the textual content of the dialog:
Customizing the dialog look & feel with CSS
You can change the visual aspect of the HTML dialog with CSS. The top-level element of the HTML dialog has a CSS class of wp-optin-dialog-container. You can add CSS rules to your page, or use the style attribute of the HTML dialog options.
Here's an example of how to set the dialog's background to plain white:
<style>
.wp-optin-dialog-container {
  background-image: none;
  background-color: white;
}
</style>
Advanced settings
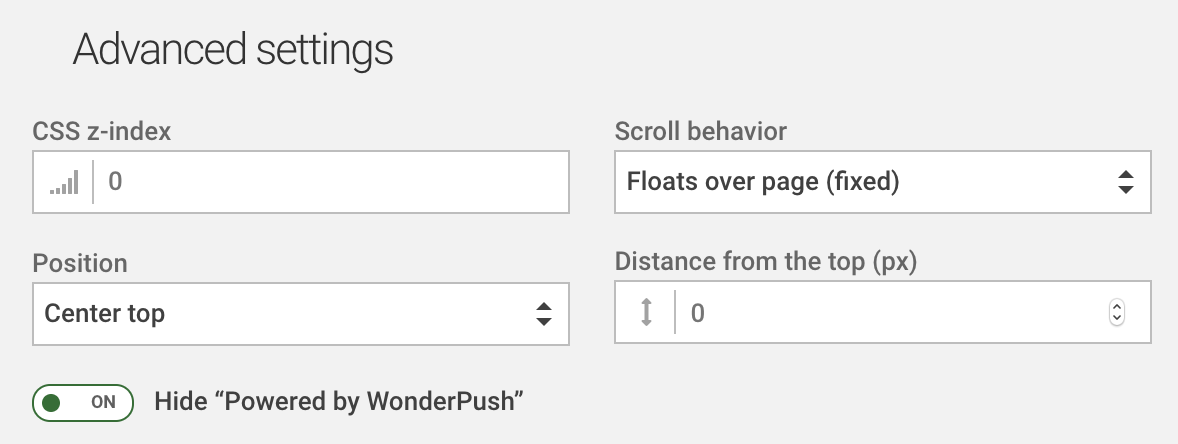
CSS z-index
Controls the “altitude” of the HTML dialog on the page. Raise this value if something on the page is displayed on top of the bell.
Scroll behavior
Controls whether the dialog floats over the page and stays always visible or scrolls with the page content.
Position
Controls where the dialog is displayed.
Distance from the edge
Allows you to specify the distance between the top (or bottom) edge of the screen and the dialog.
How to configurate HTML dialog to display one time in a hour or dayUse the following subscription dialog init options :
- closeSnooze
How long to force to wait before presenting the dialog again, if the user clicks the close button.- negativeSnooze
How long to force to wait before presenting the dialog again, if the user clicks the negative button.
Internationalization
The dialog natively supports French, Spanish, Italian, German, Portuguese, Dutch, Polish and English by default unless you customized it textual content.
To support another language, you can use the above settings: they let you customize all the texts used by the HTML dialog.
You can also use the subscription dialog init options to support more than one extra language.
Inline link
Html inline displays a clickable link and icon inlined anywhere in the page. Links are automatically inserted in the containers you specify with a CSS selector.
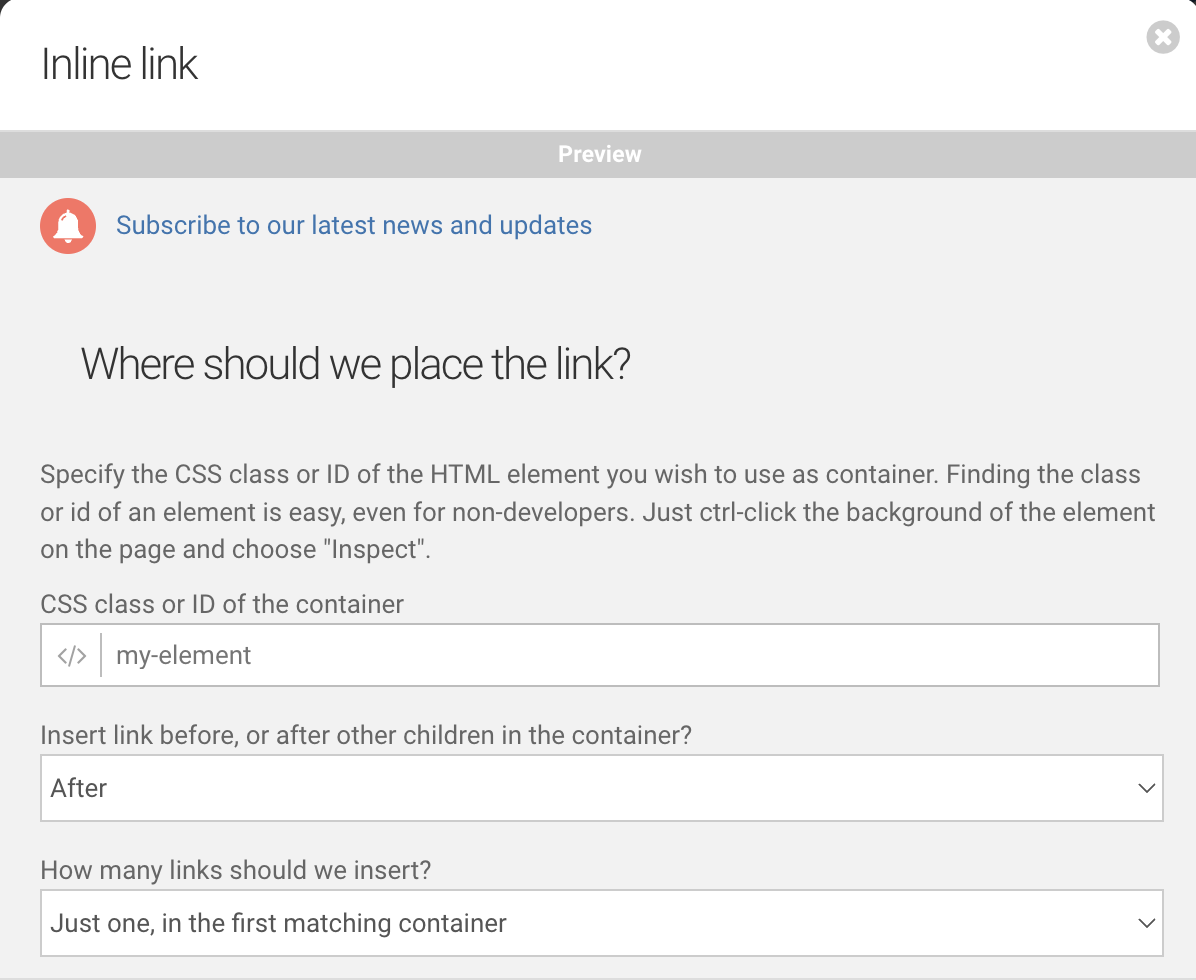
CSS class or ID of the container
In this field, you can insert the name of the CSS class or ID of the HTML element(s) you wish to put the link inside.
To identify the class or ID, go to your website, right-click on the element you wish to use as container and choose Inspect:
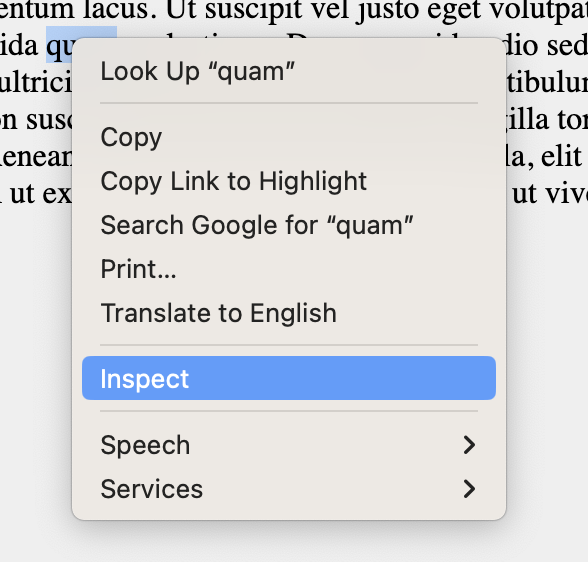

In the above example, the class is "my-link-container" so that's what you should put inside the field. No need to include the leading dot (.) or sharp sign (#).
You can choose to insert one or more links if there are more than one containers, and at the top or the bottom of the container.
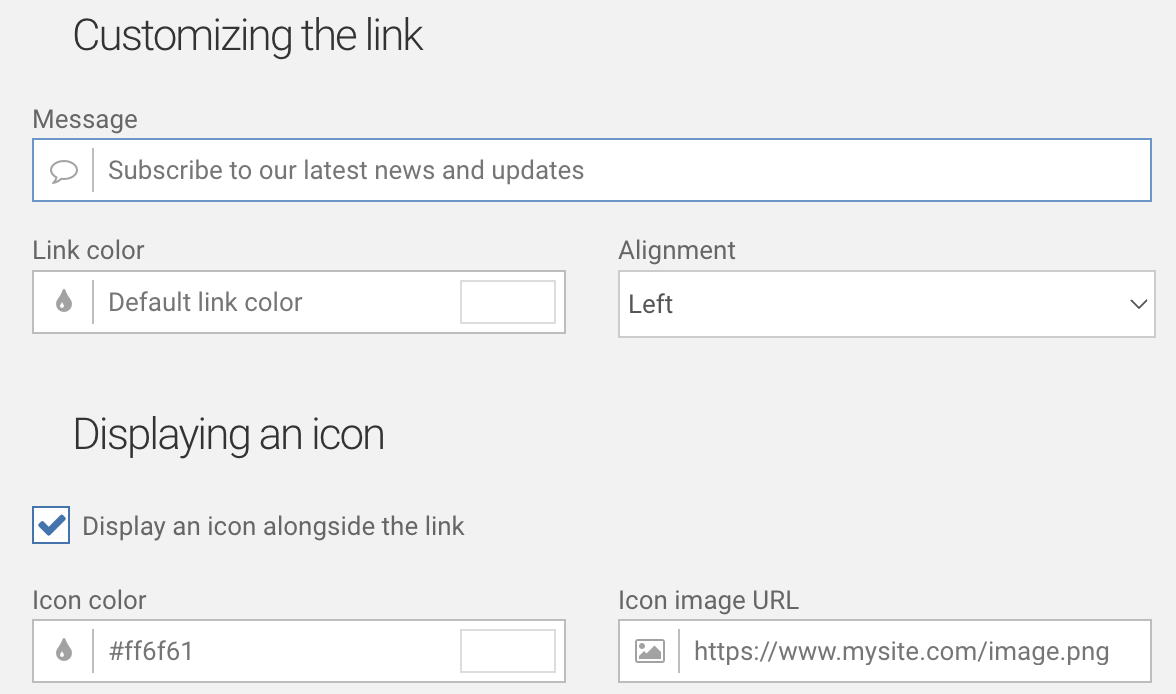
You can also customize the link text and the icon that precedes it, as well as the alignment using this form:
Cross-domain subscription popup
You might want to subscribe users from a domain that is not your main notification domain. For instance, you might want to subscribe users from shop.mydomain.com when your notification domain is www.mydomain.com, or you're using a .by.wonderpush.com domain.
When this happens, WonderPush will open the cross-domain subscription pop, which you can control directly from your dashboard.
To enable cross-domain subscription, make sure Cross-domain is active in the Settings / Website section:

If you deactivate Cross-domain, users won't be able to subscribe from any other domain than your notification domain. Projects using a
.by.wonderpush.comnotification domain cannot deactivate cross-domain.
Settings
The cross-domain settings let you control all the texts of the cross-domain popup window:
Using popups
There are 2 additional ready-to-use subscription popup templates which have the advantages of allowing full customization, rich segmentation, and multilingual variants.

The push subscription with tags is the perfect prompt to allow the user to choose the topics about which he wants to be alerted.
Push subscription popup
The popup subscription allows you to have full control of the push notification subscription sequence and the look and feel of the prompt. You can choose the trigger rules best suited to fit into the user journey and customize colors, placement and message without limit.
Discover the push subscription popup
Push subscription popup with tags
The popup subscription with tags includes all the functionalities of the push subscription popup. But in addition, it allows you to add up to 10 categories that your users can check to subscribe and not receive certain notifications. You have full control over the categories presented to the user.
When viewing and clicking the "accept" button through this prompt, all checked categories will be set as tags.
Discover the push subscription with tags
Subscription switch
The subscription switch is a very simple widget that can be placed anywhere on the page and allows users to subscribe to notifications and unsubscribe.
The subscription switch looks like this:

Basic setup
There's two ways of setting up the switch.
HTML, letting the Website SDK turn your element into a subscription switch at page load:
<div id="wonderpush-subscription-switch"
        data-sentence="Subscribe to notifications: "></div>
Or Javascript using the showSubscriptionSwitch function:
WonderPush.push(function() {
  WonderPush.showSubscriptionSwitch(
    document.getElementById('ID_OF_DESIRED_PARENT_NODE'),
    {
      sentence: "Subscribe to notifications: "
    }
  );
});
Customizing
Both methods allow the same customization options, described in the Subscription Switch Options section of the Website SDK documentation.
For example, to change the switch color, in HTML:
<div id="wonderpush-subscription-switch"
        data-color-on="#ffcc33"></div>
In Javascript:
WonderPush.push(function() {
  WonderPush.showSubscriptionSwitch(
    document.getElementById('ID_OF_DESIRED_PARENT_NODE'),
    {
      colorOn: "#ffcc33"
    }
  );
});
Tag switch
Tag switches let users subscribe and tag themselves at the same time. There's a complete guide dedicated to their use.
Opt-in by link
When you're sending a newsletter, you can provide a link to let users opt-in to your push notifications.
The link should point to your hosted wonderpush.min.html file using the domain you've configured in the dashboard, like this (see below instructions to adapt this URL):
https://YOUR_DOMAIN/wonderpush.min.html?wonderpushWebKey=YOUR_WEB_KEY&wonderpushUI=optInYou must add two query string parameters: one to initialize the SDK, the other to trigger the opt-in.
If you are using our WordPress plugin, the link should look like this:
https://YOUR_DOMAIN/wp-content/plugins/wonderpush-web-push-notifications/assets/sdk/wonderpush.min.html?wonderpushUI=optIn&wonderpushWebKey=YOUR_WEB_KEY
Here's how to construct your link:
https://: HTTPS use is mandatoryYOUR_DOMAIN: The domain you've setup in your Web settings, under Site URL./wonderpush.min.html: The path to thewonderpush.min.htmlfile, as configured in your settings.?wonderpushWebKey=YOUR_WEB_KEY: Find your webKey in the Settings page.&wonderpushUI=optIn: copy as-is.
For projects with the My site doesn't have HTTPS option enabled, use this instead:
https://: HTTPS use is mandatoryyoursite.by.wonderpush.com: Use the label you've setup in your Web settings, named Choose an HTTPS notification domain:./sdk/1.1/wonderpush.min.html?wonderpushWebKey=YOUR_WEB_KEY: Find your webKey in the Settings page.&wonderpushUI=optIn
Updated 12 months ago