
Optional data payload
Attach a JSON data payload to your notifications to be consumed when the push is received or clicked
You can send an optional JSON data payload along with your push notifications. Android and iOS also support sending silent push notifications to update your app in the background without drawing users attention.
Attaching a JSON data payload to your notifications
There are 2 ways to attach a JSON payload to your notifications:
- the online dashboard payload form
- the API, specifying additional data
Please note that attaching a JSON payload to a notification is not the easiest way to pass data to your application or website.
For most cases, passing data in the query string of a link (websites) or a deep-link (mobile apps) should be enough. Here's our documentation on deep-links for mobile apps.
Attaching a JSON payload to your notifications is especially useful in these scenarii:
- You are sending silent push notifications (which are not available on websites)
- You need to update your app when the notification is received
- You want to update your app with data, independently from the user journey and the target URL of the notification
Consuming the push payload
The push payload can be consumed when the notifications are clicked or received. It involves a bit of programming and an object called the WonderPush Delegate, which gets notified when a notification is clicked or received. We'll see how to implement and register the WonderPush Delegate later in this document.
First, let's review possibilities and limitations for each platform (iOS, Android, Websites) and scenario (reception, click, silent pushes).
Consuming the push payload on notification click
On mobile apps
Consuming the push payload when notifications are clicked in mobile apps is easy and involves the creation and registration of the WonderPush Delegate which gets called back with the push notification data upon click.
On Websites
On websites, consuming the push payload when a notification is clicked involves updating your service worker, which is the wonderpush-worker-loader.min.js file you've installed at the root of your website when you've set up WonderPush. If you are not familiar with service workers, there's documentation on MDN or Google.
importScripts('https://cdn.by.wonderpush.com/sdk/1.1/wonderpush-loader.min.js');
WonderPush.init({
  webKey: (location.search.match(/[?&]webKey=([^&]*)/) || [])[1],
});

// Add the lines below to listen to clicked notifications
self.addEventListener('notificationclick', function(event) {
  // The notification payload is in event.notification.data,
  // Make sure NOT to call any method on the event object, or WonderPush might not work properly.
  console.log('notification clicked', event.notification.data);
});
Consuming the push payload on notification received
On mobile apps
Consuming the push payload when a notification is received by a mobile app is easy and involves the creation and registration of the WonderPush Delegate which gets called back with the push notification upon reception.
There are several limitations though:
- On iOS, only notifications with
content-available=1will trigger a delegate callback. WonderPush will automatically setcontent-available=1for all push notifications with a JSON payload. This does NOT work in the iOS simulator, only on real devices. These notifications might be delayed and/or rate-limited by Apple. There is official documentation on the subject here and here. - On Android, if you are using Cordova, the WonderPush Delegate will NOT be called back when your app is not already running because there is no safe way to start cordova and execute a single piece of code. The entire webview would be loaded and your whole app would start as normal albeit in the background, leading to poor battery life.
- On Android, if you are using Flutter and you wish the WonderPush Delegate to be called back when your app is not already running, you'll have to specify a dart entry point in your app's
Manifest.xml. Detailed instructions below.
On Websites
On websites, consuming the push payload when a notification is received involves updating your service worker, which is the wonderpush-worker-loader.min.js file you've installed at the root of your website when you've set up WonderPush. If you are not familiar with service workers, there's documentation on MDN or Google.
importScripts('https://cdn.by.wonderpush.com/sdk/1.1/wonderpush-loader.min.js');
WonderPush.init({
  webKey: (location.search.match(/[?&]webKey=([^&]*)/) || [])[1],
});

// Add the lines below to listen to received notifications
self.addEventListener('push', function(event) {
  // The notification payload is in event.data.json(),
  // Make sure NOT to call any method on the event object, or WonderPush might not work properly.
  try {
    console.log('notification received', event.data.json());
  } catch (e) { console.error(e); }
});
Silent push notifications
On websites, silent push notifications are not available due to a choice by browser vendors (Google Chrome, Apple Safari, etc) to enforce a strict policy that forces user awareness of push notification reception.
On mobile applications, push notifications can be silent and received without the user's knowledge. This is useful to update your app in the background. Handling silent push notifications when they are received is done just like any other push, using the WonderPush Delegate. Clicks never happen, since there is no displayed notification to click on, so users are unaware of silent push notifications.
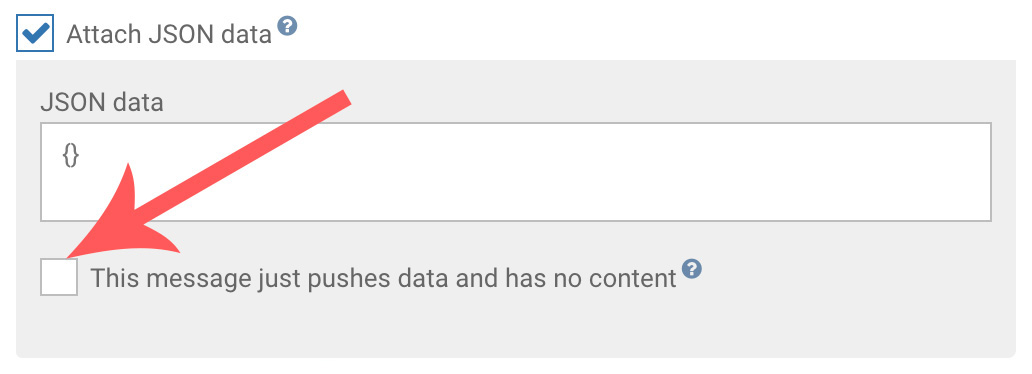
To create a silent push notification from our dashboard, check "Attach JSON data" and "This message just pushes data and has no content".
To create a silent push notification using our API, simply omit any textual content in the text or title fields of the notification object:
curl -XPOST https://management-api.wonderpush.com/v1/deliveries?accessToken="YOUR_ACCESS_TOKEN" \
       -d targetSegmentIds=YOUR_SEGMENT_ID \
       -d notification='{"push": {"payload":{"exampleKey":"exampleValue"}}}'
On mobile applications, you can also use silent push notifications to remove an existing push notification from the device's notification center. To achieve this:
- Be sure to add a tag to push notifications you want to be able to remove later. This can be done by setting
alert.tagin your notification payload (see our API reference) - Adapt
YOUR_TAGin the following JSON payload and attach it to your silent push:{"_wp":{"receiveActions":[{"type":"closeNotifications","tag":"YOUR_TAG"}]}}
You can send notifications with a tag using our API like this:
curl -XPOST https://management-api.wonderpush.com/v1/deliveries \
    -d accessToken=YOUR_APPLICATION_ACCESS_TOKEN \
    -d targetUserIds=johndoe \
    -d notification='{"alert":{"title":"New message from Kathy","text":"Hi John, how are you?","tag":"YOUR_TAG"}}'
Implementing and registering the WonderPush Delegate (mobile apps only)
You can implement and register a delegate with WonderPush in order to be notified when a notification is clicked.
Implementing a delegate is easy and looks like this:
package com.example.wonderpushexample;

import com.wonderpush.sdk.WonderPushDelegate;

import org.json.JSONObject;

public class MyDelegate implements WonderPushDelegate {

    @Override
    public void onNotificationOpened(JSONObject notif, int buttonIndex) {
        // Do something on notification clicked
    }

    @Override
    public void onNotificationReceived(JSONObject notif) {
        // Do something on notification received
    }

}
#import "AppDelegate.h"
#import <WonderPush/WonderPush.h>

// Using your AppDelegate as WonderPushDelegate is the easiest solution,
// although it could be any other object, as long as you keep a strong reference to it.
@interface AppDelegate () <WonderPushDelegate>

@end

@implementation AppDelegate

// ... Other app delegate methods

- (void)onNotificationOpened:(NSDictionary *)notification withButton:(NSInteger)buttonIndex {
    // Do something on notification opened.
}

- (void)onNotificationReceived:(NSDictionary *)notification {
    // Do something on notification received.
    // Only notifications with content-available=1 will trigger this method.
    // See https://developer.apple.com/documentation/usernotifications/setting_up_a_remote_notification_server/pushing_background_updates_to_your_app?language=objc
    // WonderPush automatically sets content-available=1 when the push notification has a JSON payload.
}

@end
import UIKit
import WonderPush
// Using your AppDelegate as WonderPushDelegate is the easiest solution,
// although it could be any other object, as long as you keep a strong reference to it.
@main
class AppDelegate: UIResponder, UIApplicationDelegate, WonderPushDelegate {
// ... Other AppDelegate methods
func onNotificationOpened(_ notification: [AnyHashable : Any], withButton buttonIndex: Int) {
// Do something on notification opened
}
func onNotificationReceived(_ notification: [AnyHashable : Any]) {
// Do something on notification received.
// Only notifications with content-available=1 will trigger this method.
// See https://developer.apple.com/documentation/usernotifications/setting_up_a_remote_notification_server/pushing_background_updates_to_your_app?language=objc
// WonderPush automatically sets content-available=1 when the push notification has a JSON payload.
}
}var myDelegate = {
onNotificationOpened: function(notif, buttonIndex) {
// Do something on notification opened
},
onNotificationReceived: function(notif) {
// Do something on notification received.
//
// For Cordova, this method is not called on Android devices when your app is not started because we haven't found a safe way to start cordova and execute a single piece of code.
// The entire webview would be loaded, leading to poor battery life.
//
// On iOS, only notifications with content-available=1 will trigger this method.
// See https://developer.apple.com/documentation/usernotifications/setting_up_a_remote_notification_server/pushing_background_updates_to_your_app?language=objc
// WonderPush automatically sets content-available=1 when the push notification has a JSON payload.
},
};
import 'package:wonderpush_flutter/wonderpush_flutter.dart';
class MyDelegate implements WonderPushDelegate {

  @override
  void onNotificationOpened(Map<String, dynamic> notification, int buttonIndex) {
    // Do something on notification opened
  }

  @override
  void onNotificationReceived(Map<String, dynamic> notification) {
    // Do something on notification received.
    //
    // This method is not called on Android devices when your app is not started
    // unless you register a dart entry point in your manifest as explained below.
    //
    // On iOS, only notifications with content-available=1 will trigger this method.
    // See https://developer.apple.com/documentation/usernotifications/setting_up_a_remote_notification_server/pushing_background_updates_to_your_app?language=objc
    // WonderPush automatically sets content-available=1 when the push notification has a JSON payload.
  }

}
To register your delegate, simply call WonderPush.setDelegate:
// You can do this in the onCreate() method of your Application class,
// or look at one of the alternative methods below
WonderPush.setDelegate(new MyDelegate());
- (BOOL)application:(UIApplication *)application willFinishLaunchingWithOptions:(NSDictionary<UIApplicationLaunchOptionsKey,id> *)launchOptions {
// ... WonderPush initialization snippet (setClientId:secret:)
// Adapt "self" if you're using another object than AppDelegate as WonderPush Delegate
// Make sure to keep a strong reference on the WonderPush delegate if you're using another object than AppDelegate
[WonderPush setDelegate:self];
return YES;
}
// Add this line right after the WonderPush initialization in the AppDelegate


import UIKit
import WonderPush

@main
class AppDelegate: UIResponder, UIApplicationDelegate, WonderPushDelegate {


    func application(_ application: UIApplication, willFinishLaunchingWithOptions launchOptions: [UIApplication.LaunchOptionsKey : Any]? = nil) -> Bool {

      // ... WonderPush initialization snippet (WonderPush.setClientId(secret:))

      // Adapt "self" if you're using another object than AppDelegate as WonderPush Delegate
  		// Make sure to keep a strong reference on the WonderPush delegate if you're using another object than AppDelegate
			WonderPush.setDelegate(self)
      return YES
    }
    // ... Other AppDelegate methods
}WonderPush.setDelegate(myDelegate);// Put this at the top of your src/main.ts
(<any>window).WonderPush.setDelegate(myDelegate);import WonderPush from 'react-native-wonderpush';
// Please note: If you want to intercept clicks on notifications when the app is not started,
// you must register your delegate at the top level of your App.tsx file
WonderPush.setDelegate(myDelegate);WonderPush.setDelegate(new MyDelegate());On Android, the WonderPush Delegate can also be registered by:
- setting a meta-data in the Manifest.xml:
<meta-data android:name="com.wonderpush.sdk.delegateClass" android:value="com.example.MyDelegate" />- setting a
buildConfigFieldin yourapp/build.gradle:
buildConfigField 'String', 'WONDERPUSH_DELEGATE_CLASS', '"com.example.MyDelegate"'- setting a string resource in your
app/src/main/res/values/strings.xml:
<string name="wonderpush_delegateClass">com.example.MyDelegate</string>
Flutter: specifying a dart entry-point to listen to received notifications when the app is not running
On Android, if you wish to get called back when a notification is received while the app is not running you can set the following in your AndroidManifest.xml:
<meta-data android:name="com.wonderpush.sdk.dartEntryPointFunctionName" android:value="myEntryPoint" />
Adapt myEntryPoint above to put the name of the Dart function you wish called when WonderPush wakes the Flutter engine. Avoid using main here, as your entire application would be woken up whenever a push notification is received, leading to poor battery life.
When this meta-data is present and a notification is received, WonderPush will try to use an existing Flutter engine or start a new one with the specified Dart entry-point function. That function should call either runApp(); or WidgetsFlutterBinding.ensureInitialized();, before registering the WonderPush delegate.
import 'package:flutter/material.dart';

@pragma('vm:entry-point')
void myEntryPoint() {
  // Make sure to call this method first
  WidgetsFlutterBinding.ensureInitialized();
  // Register your delegate with WonderPush to get called back.
  WonderPush.setDelegate(new MyDelegate());
}
Updated 12 months ago